Watch how to make it
Real chicken teriyaki is nothing like the gloopy, over-sweet takeout version. Authentic teriyaki is a glossy glaze of just four pantry ingredients — soy sauce, mirin, sake and sugar — reduced until it clings to pan-seared chicken. It’s a 20-minute weeknight dinner that tastes far better than its effort.
We tested this with thigh and breast; thigh wins for juiciness, but both work with the same glaze.
Why this recipe works
- Sear skin-side down first for crisp skin and rendered fat to glaze in.
- The 1:1:1:1 sauce ratio (soy : mirin : sake : sugar) is foolproof and balanced.
- Reduce the glaze in the same pan so it picks up the chicken’s savory fond.
Key ingredients
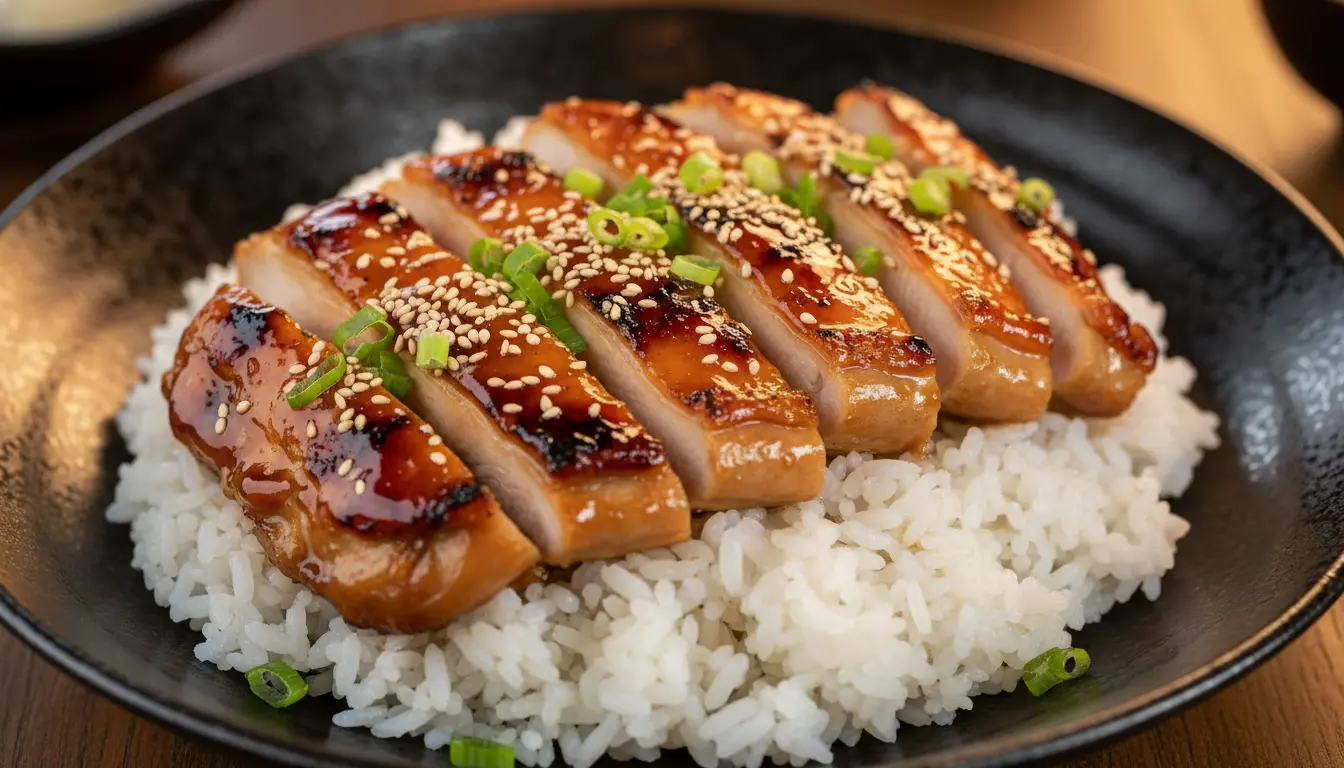
Boneless chicken thighs, soy sauce, mirin, sake and sugar. That’s the entire glaze — no cornstarch, no bottled teriyaki needed. Serve over steamed rice with sesame seeds and scallions.
Tips from our kitchen
- Pat the chicken dry before searing for the best browning.
- Let the glaze bubble until it coats the back of a spoon, then turn the chicken to coat.
- No sake? Substitute dry sherry or a splash of water plus extra mirin.
Japanese Chicken Teriyaki
Ingredients
Method
- Pat chicken dry. Sear skin-side down in a dry pan until crisp and golden.
- Flip and cook through; remove excess fat.
- Mix soy, mirin, sake and sugar; pour into the pan.
- Simmer until the glaze coats the back of a spoon.
- Turn the chicken to coat in the glaze.
- Slice and serve over rice with sesame seeds and scallions.
Notes
Frequently asked questions
Thigh or breast?
Thigh stays juicier and is more forgiving. Use breast if you prefer leaner meat, but watch it closely so it doesn’t dry out.
What is mirin?
A sweet Japanese rice wine that gives teriyaki its shine and gentle sweetness. If unavailable, use a little sugar dissolved in rice vinegar as a rough substitute.
How do I get it glossy?
Reduce the sauce properly — the shine comes from the sugar and mirin concentrating, not from cornstarch.
Variations & Substitutions
While our classic Japanese Chicken Teriyaki recipe is perfected for flavor and texture, don’t hesitate to experiment with these expert-approved adjustments to suit your pantry or preferences:
- Chicken Cut: While boneless, skin-on chicken thighs are king for juiciness and flavor, you can absolutely use boneless, skinless chicken breast. To prevent drying, consider brining the breast for 30 minutes in a 1.5% salt solution (1.5g salt per 100ml water) before cooking. Adjust cooking time accordingly, aiming for an internal temperature of 165°F (74°C).
- Sweetener: For a slightly different depth of sweetness, substitute honey or light brown sugar for granulated sugar. Use 1 tablespoon of honey or 1.5 tablespoons of light brown sugar for every 1 tablespoon of granulated sugar.
- Soy Sauce: For a gluten-free version, use tamari in place of regular soy sauce. If you’re watching sodium intake, opt for a low-sodium soy sauce and adjust seasoning later if needed.
- Sake Alternative: If you don’t have sake, a dry sherry or even a dry white wine (like Sauvignon Blanc) can be used in a pinch, though the flavor profile will differ slightly. You can also omit it, but you’ll lose some of the authentic depth; consider adding a splash of chicken broth to compensate for the liquid.
- Garnish: Beyond toasted sesame seeds and thinly sliced scallions, consider a sprinkle of shichimi togarashi (Japanese seven-spice blend) for a delightful kick, or finely shredded nori (seaweed) for an umami boost.
- Add Vegetables: For a complete meal in one pan, stir-fry quick-cooking vegetables like broccoli florets, snap peas, bell peppers, or sliced mushrooms in the same pan after cooking the chicken, then toss them with the finished teriyaki sauce.
What to Serve With It
A well-balanced Japanese meal complements the rich, savory-sweetness of Teriyaki Chicken with contrasting textures and flavors. Think about refreshing, palate-cleansing sides that cut through the richness and add a sense of tradition to your plate.
- Steamed Short-Grain Rice: The quintessential pairing. Its neutral flavor and sticky texture perfectly absorb the delicious teriyaki sauce.
- Miso Soup: A light, savory broth with tofu and seaweed provides a comforting and authentic start or accompaniment.
- Pickled Ginger (Gari): The sharp, sweet, and spicy notes of pickled ginger are excellent for cleansing the palate between bites of rich chicken.
- Blanched Greens with Sesame Dressing (Gomae): Spinach or green beans lightly blanched and tossed with a simple sesame dressing (toasted sesame seeds, soy sauce, a touch of sugar) offer a refreshing counterpoint.
- Sunomono (Cucumber Salad): Thinly sliced cucumbers marinated in a sweet and tangy vinegar dressing provide a crisp, cooling, and acidic contrast.
- Simple Green Salad: A mix of crisp lettuce with a light, Japanese-style dressing (like a ginger-sesame vinaigrette) adds freshness without overwhelming the main dish.
Make Ahead, Storage & Reheating
Japanese Chicken Teriyaki is a fantastic dish for meal prep, as both the chicken and the sauce hold up beautifully. Here’s how to manage it expertly:
- Make Ahead:
- Teriyaki Sauce: The sauce can be made up to 5 days in advance and stored in an airtight container in the refrigerator. It may thicken slightly; gently warm it on the stovetop over low heat, adding a teaspoon of water or sake if needed, before serving.
- Marinated Chicken: You can marinate the chicken for up to 24 hours in the refrigerator. Ensure it’s in a non-reactive container or a sealed bag.
- Storage:
- Refrigeration: Once cooked, store leftover chicken teriyaki and any remaining sauce in separate airtight containers in the refrigerator for up to 3-4 days.
- Freezing: For longer storage, cooked chicken teriyaki can be frozen for up to 2-3 months. Allow the chicken to cool completely, then transfer it to freezer-safe bags or containers with a little extra sauce to prevent drying. Thaw overnight in the refrigerator before reheating.
- Reheating:
- Microwave: For individual portions, place chicken and sauce in a microwave-safe dish, cover loosely, and heat on medium power for 1-2 minutes, stirring halfway, until heated through. Be careful not to overheat, which can dry out the chicken.
- Stovetop: For larger portions or to retain crispy skin, place the chicken and sauce in a skillet over medium-low heat. Add a tablespoon of water or sake to help rehydrate and prevent sticking. Cover and gently warm for 5-7 minutes, flipping the chicken once, until heated through.
- Oven: For the best results, especially if you want to revive crispy skin, preheat your oven to 300°F (150°C). Place chicken on a baking sheet, add a splash of water or broth to the bottom of the pan, cover loosely with foil, and heat for 10-15 minutes. For a crisper finish, remove the foil for the last 5 minutes.
Common Mistakes to Avoid
Even a seemingly simple dish like Chicken Teriyaki has pitfalls. Sidestep these common errors for consistently perfect results:
- Overcooking the Chicken: Teriyaki chicken should be juicy and tender, not dry and tough. Use a meat thermometer to ensure chicken thighs reach 175°F (80°C) for optimal tenderness (chicken breast to 165°F/74°C). Pull it off the heat just as it hits this mark, as it will continue to cook slightly while resting.
- Burning the Sauce: The high sugar content in teriyaki sauce makes it prone to burning if the heat is too high or if it’s left unattended. Always simmer the sauce over medium-low to medium heat, stirring frequently, especially as it thickens. If it starts to brown too quickly, reduce the heat immediately.
- Not Reducing the Sauce Enough: A thin, watery sauce won’t coat the chicken properly and lacks the desired depth of flavor. Be patient and allow the sauce to simmer until it visibly thickens to a syrupy consistency that clings to the back of a spoon. This typically takes 8-12 minutes for a standard batch.
- Crowding the Pan: When searing the chicken, resist the urge to cram too many pieces into the pan. Crowding lowers the pan’s temperature, causing the chicken to steam rather than sear, resulting in less browning and less flavor. Cook in batches if necessary, ensuring each piece has enough space.
- Skipping the Rest: After cooking, let the chicken rest for 5-10 minutes before slicing. This allows the juices to redistribute throughout the meat, ensuring every bite is succulent and flavorful.
More Questions
Can I use chicken breast instead of thighs for this recipe?
Yes, you can! However, chicken breast is leaner and tends to dry out more easily. To get the best results, we recommend brining the chicken breast for 30 minutes in a 1.5% salt solution before marinating. Cook it to an internal temperature of 165°F (74°C), which is lower than thighs, and be mindful not to overcook. You may also want to slice the breast into thinner cutlets or pieces to ensure even cooking and better sauce penetration.
Why is my teriyaki sauce too thin and not coating the chicken?
The most common reason for a thin teriyaki sauce is insufficient reduction. The sauce needs to simmer over medium-low heat for a good 8-12 minutes, uncovered, until the sugar caramelizes slightly and the liquid evaporates, allowing it to thicken into a glossy, syrupy consistency. If it’s still too thin after this time, you can whisk in a cornstarch slurry (1 tsp cornstarch mixed with 1 tbsp cold water) and simmer for another minute until it reaches your desired thickness.
What’s the secret to getting crispy skin on my teriyaki chicken?
The key to truly crispy skin lies in a few crucial steps. First, ensure your chicken skin is thoroughly patted dry with paper towels before cooking. Second, place the chicken skin-side down in a cold, non-stick or well-seasoned cast-iron pan. Turn the heat to medium-low and allow the fat to render slowly for about 8-10 minutes, pressing down occasionally with a spatula. This slow rendering process crisps the skin beautifully without burning. Once golden and crisp, increase the heat to medium-high to finish cooking the other side and glaze with the sauce.