AIO Kitchen
  • Home
  • Recipes
  • Guides
  • Reviews
  • About AIO Kitchen
  • Contact
  • Cuisines
    • Vietnamese
    • Thai
    • Korean
    • Japanese
    • Chinese
  • English
    • Français
    • Deutsch
    • 日本語
    • 한국어
    • Español
    • Tiếng Việt
AIO Kitchen
Tested recipes · smart guides · honest reviews
Home - Chinese
Category:

Chinese

Authentic Chinese recipes — kung pao chicken, Yangzhou fried rice, beef and broccoli and more, with takeout-style results at home.

Watch: Chinese Recipe Videos

Chinese Beef and Broccoli
ChineseRecipes

Chinese Beef and Broccoli

by D L May 25, 2026
written by D L

Watch how to make it

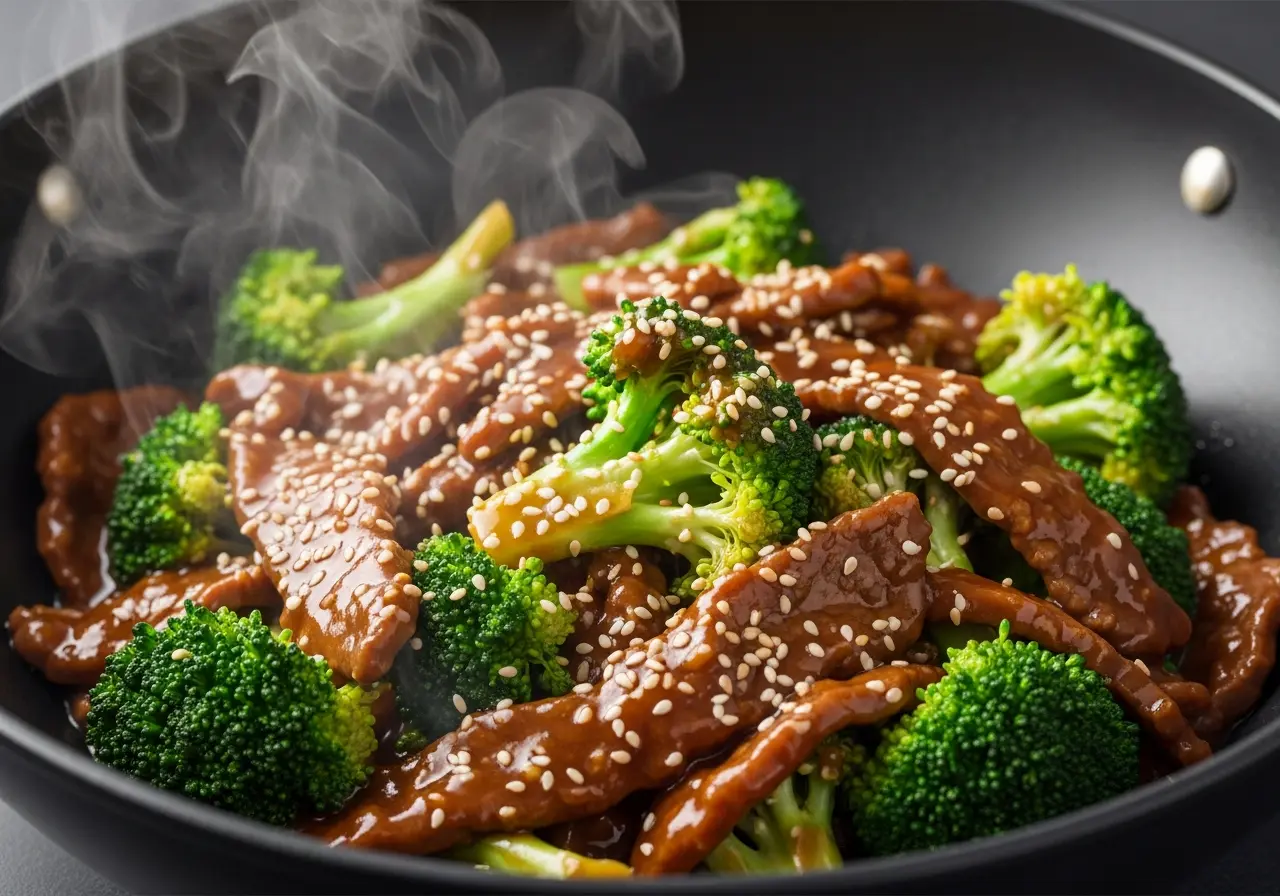
Beef and broccoli is the takeout order everyone knows, but the homemade version is in another league: silky, tender beef thanks to a quick velveting trick, broccoli that’s still bright and crisp, and a savory brown sauce that clings to every piece. It comes together in 30 minutes in a single wok.

Why this recipe works

  • Velvet the beef — a baking-soda and cornstarch marinade keeps the slices melt-in-the-mouth tender.
  • Blanch the broccoli — 60 seconds in boiling water sets the color and shortens the stir-fry.
  • Sauce that clings — a touch of cornstarch gives the classic glossy coat without gloopiness.

Key ingredients

Flank or sirloin steak, broccoli, garlic, ginger, and a sauce of light and dark soy, oyster sauce, and a little sugar. Full amounts in the recipe card below.

Tips from our kitchen

  • Slice the beef thinly against the grain for maximum tenderness.
  • A pinch of baking soda in the marinade is the restaurant secret to velvety beef — don’t skip it.
  • Get the wok smoking hot and cook in batches so the beef sears instead of steaming.

Frequently asked questions

What cut of beef is best?

Flank steak, sirloin, or skirt — all are flavorful and stay tender when sliced thin and velveted. Avoid stewing cuts.

What does velveting do?

The baking soda raises the meat’s pH and the cornstarch forms a protective coat, so the beef stays juicy and silky even over high heat.

Can I add other vegetables?

Yes — snap peas, carrots, or mushrooms all work. Add quick-cooking veg with the broccoli.

Chinese Beef and Broccoli

Chinese Beef and Broccoli

Print Recipe Pin Recipe
Prep Time 20 minutes mins
Cook Time 10 minutes mins
Total Time 30 minutes mins
Servings: 3 servings
Course: Main Course
Cuisine: Chinese
Ingredients Method Notes

Ingredients
  

  • 400 g flank steak thinly sliced
  • 1/2 tsp baking soda
  • 1 tbsp cornstarch plus 1 tsp for sauce
  • 1 tbsp light soy sauce for marinade
  • 400 g broccoli cut into florets
  • 3 cloves garlic minced
  • 1 tbsp ginger minced
  • 2 tbsp oyster sauce
  • 1 tbsp light soy sauce
  • 1 tsp dark soy sauce
  • 1 tsp sugar
  • 1/2 cup water
  • 2 tbsp neutral oil

Method
 

  1. Toss the sliced beef with baking soda, 1 tbsp cornstarch and 1 tbsp soy sauce; rest 20 minutes, then rinse and pat dry.
  2. Blanch the broccoli in boiling water for 60 seconds, then drain.
  3. Mix the oyster sauce, both soy sauces, sugar, 1 tsp cornstarch and water into a sauce.
  4. Sear the beef in a smoking-hot wok with 1 tbsp oil, in batches, until just browned; remove.
  5. Add the remaining oil, garlic and ginger; fry 15 seconds until fragrant.
  6. Return the beef, add the broccoli and the sauce; toss until glossy and thickened, about 1 minute.

Notes

Rinsing off the baking-soda marinade is important — it removes any soapy taste while keeping the tenderizing effect.

Variations & substitutions

  • Beef Cuts: While flank steak is traditional for its texture and ability to slice thinly against the grain, you can absolutely use other cuts. Sirloin steak, skirt steak (also sliced against the grain), or even beef tenderloin (for a more luxurious, melt-in-your-mouth experience) work beautifully. Adjust cooking times slightly as needed.
  • Vegetable Swaps: Broccoli is classic, but this sauce is versatile. Try adding or substituting with snap peas, thinly sliced carrots, bell peppers (red or yellow for sweetness), water chestnuts for crunch, or even sliced mushrooms. For a vibrant mix, blanch a few different vegetables together.
  • Sauce Enhancements: For a spicier kick, add 1-2 teaspoons of chili garlic sauce or a pinch of red pepper flakes to the sauce mixture. A teaspoon of hoisin sauce can add a deeper, sweeter umami note. For a different flavor profile, a tablespoon of fermented black bean sauce (mashed) can be incorporated.
  • Gluten-Free: Easily make this dish gluten-free by substituting regular soy sauce with tamari. Ensure any other ingredients, like oyster sauce, are certified gluten-free.
  • Low-Sodium: Opt for low-sodium soy sauce and adjust the amount of added salt to your preference. You can also reduce the amount of oyster sauce or choose a low-sodium version.

What to serve with it

Chinese Beef and Broccoli is a complete meal in itself, but it truly shines when paired with simple, complementary dishes that balance its rich, savory sauce and tender beef. The goal is to provide a neutral base or a fresh counterpoint to enhance the main event without overwhelming it. Think about textures and subtle flavors that round out the experience.
  • Steamed Jasmine Rice: The quintessential pairing. Its fragrant, fluffy grains are perfect for soaking up every drop of that delicious sauce.
  • Brown Rice: For a nuttier flavor and added fiber, brown rice is an excellent, wholesome alternative.
  • Simple Stir-fried Noodles: Think plain lo mein or thin egg noodles, perhaps tossed with a touch of sesame oil and soy sauce, offering a different textural experience.
  • Garlic Bok Choy: Lightly stir-fried or steamed bok choy with a hint of garlic and soy sauce provides a refreshing, crisp green element.
  • Egg Drop Soup: A light, comforting soup to start the meal, offering a delicate contrast to the main dish.
  • Spring Rolls or Egg Rolls: For a classic appetizer, these crispy delights add a satisfying crunch.

Make ahead, storage & reheating

This recipe is fantastic for meal prep, making weeknight dinners a breeze. Proper storage ensures you can enjoy the delicious flavors for days to come.
  • Make Ahead: You can prepare several components in advance. Slice and marinate the beef up to 24 hours ahead, storing it in an airtight container in the refrigerator. The broccoli can be cut and blanched (if desired) a day in advance. The sauce can also be whisked together and stored in the fridge for up to 3 days. This significantly cuts down on active cooking time.
  • Storage: Once cooked, allow the Beef and Broccoli to cool completely before transferring it to an airtight container. It will keep well in the refrigerator for 3-4 days. For longer storage, it can be frozen in a freezer-safe container for up to 2-3 months. Note that the broccoli’s texture may soften slightly upon thawing and reheating.
  • Reheating:
    • Stovetop (Recommended): For best results, reheat on the stovetop over medium heat. Add a splash (1-2 tablespoons) of water or chicken broth to help loosen the sauce and prevent sticking. Cover and cook, stirring occasionally, until heated through, about 5-7 minutes.
    • Microwave: Place a single serving in a microwave-safe dish, cover with a lid or damp paper towel, and heat on medium power for 1-2 minutes, stirring halfway through, until hot. Be careful not to overcook the beef, which can make it tough.

Common mistakes to avoid

  • Overcooking the Beef: This is the most common pitfall. Flank steak cooks quickly. High heat, quick searing (90 seconds per side for thin slices) is key to achieving tender, juicy beef. Overcooking will result in dry, tough meat. The velveting process helps tremendously, but don’t rely on it to save overcooked beef.
  • Undercooking or Overcooking the Broccoli: You want tender-crisp broccoli, not mushy or raw. Blanching or steaming the broccoli for 2-3 minutes before adding it to the stir-fry ensures it’s perfectly cooked through but still retains some bite and vibrant color. If adding raw, ensure it gets enough time in the wok to soften.
  • Crowding the Pan: When stir-frying, it’s crucial to cook in batches, especially the beef. If you add too much meat at once, the temperature of the wok drops, and the beef will steam rather than sear, leading to a grey, less flavorful result. Give your ingredients space to brown properly.
  • Insufficient Marination Time: The marinade does more than just flavor the beef; the cornstarch creates a protective coating, and baking soda tenderizes. Skimping on the 20-30 minute marination time means you’ll miss out on the signature tender texture and deep flavor.
  • Not Thickening the Sauce Properly: A runny sauce won’t cling to the beef and broccoli, and a clumpy sauce is unpleasant. Ensure your cornstarch slurry is well-mixed before adding it to the hot sauce, then stir constantly until it thickens to your desired consistency. If it’s too thick, add a splash of water or broth; if too thin, a bit more slurry.

More questions

How do I get my beef super tender, like at a restaurant?

A: The secret to restaurant-tender beef is a technique called ‘velveting.’ Before marinating, toss your thinly sliced beef with a small amount of baking soda (about 1/2 teaspoon per pound of beef) and let it sit for 15-20 minutes. Rinse the beef thoroughly under cold water to remove the baking soda, then pat dry before adding your standard marinade (soy sauce, cornstarch, oil). The baking soda tenderizes the meat fibers, and the cornstarch creates a protective coating that keeps the beef moist during high-heat cooking. Don’t skip rinsing, or your beef might taste soapy!

My sauce isn’t thickening. What went wrong?

A: The most common reasons for a sauce not thickening are either not enough cornstarch slurry or not heating the sauce sufficiently after adding the slurry. Cornstarch needs to reach a certain temperature to activate its thickening properties. Ensure your sauce is at a gentle simmer when you slowly pour in the well-mixed slurry, stirring constantly. If it’s still too thin after a minute of simmering, you can make a small additional slurry (1 tsp cornstarch + 1 tsp cold water) and add it incrementally until you reach your desired consistency. Make sure your slurry is made with *cold* water, as hot water will cause the cornstarch to clump.

Can I make this dish spicier?

A: Absolutely! There are several ways to add heat. You can incorporate 1-2 teaspoons of chili garlic sauce or Sriracha directly into your sauce mixture. For a more direct heat, stir in a pinch of red pepper flakes with your aromatics (garlic and ginger) or directly into the sauce. For fresh, vibrant heat, thinly slice a few bird’s eye chilies or serrano peppers and add them during the stir-frying process with the other vegetables, or as a garnish for those who prefer more fire.
May 25, 2026 0 comments
1 FacebookTwitterPinterestEmail
A generous serving of colorful Yangzhou Chinese Fried Rice, featuring shrimp and char siu.
ChineseRecipes

Yangzhou Chinese Fried Rice

by D L May 25, 2026
written by D L

Watch how to make it

Yangzhou fried rice is the benchmark Chinese fried rice — light, separate grains studded with shrimp, char siu, egg and peas. The secret isn’t a long ingredient list; it’s day-old rice, a screaming-hot wok, and working fast so every grain fries rather than steams.

Why this recipe works

  • Cold day-old rice has dried out, so grains separate and fry instead of clumping.
  • Scramble the egg first, then add rice — coating grains in egg keeps them fluffy.
  • High heat, small batches deliver that smoky “wok hei”.

Key ingredients

Day-old cooked rice, shrimp, char siu (or ham), eggs, peas, carrot, scallions, soy sauce and white pepper. Full method in the recipe card.

Tips from our kitchen

  • Spread fresh rice on a tray and chill if you don’t have day-old rice.
  • Have everything prepped — fried rice cooks in minutes.
  • Season lightly with soy; Yangzhou rice should stay pale, not brown.

A generous serving of colorful Yangzhou Chinese Fried Rice, featuring shrimp and char siu.

Yangzhou Fried Rice

Print Recipe Pin Recipe
Prep Time 15 minutes mins
Cook Time 10 minutes mins
Total Time 25 minutes mins
Servings: 3 servings
Course: Main Course
Cuisine: Chinese
Ingredients Method Notes

Ingredients
  

  • 3 cups day-old cooked rice
  • 150 g shrimp
  • 100 g char siu diced
  • 2 eggs
  • 1/2 cup peas
  • 1 carrot diced
  • 2 scallions
  • 1 tbsp soy sauce
  • 1 pinch white pepper

Method
 

  1. Scramble the eggs in a hot oiled wok; remove.
  2. Stir-fry shrimp and char siu until just cooked.
  3. Add the cold rice, breaking up clumps, and toss over high heat.
  4. Add peas and carrot; return the egg.
  5. Season with soy sauce and white pepper, finish with scallions.

Notes

Cold day-old rice is essential for separate, fluffy grains.

Frequently asked questions

Why is my fried rice mushy?

Freshly cooked or warm rice steams instead of frying. Use cold, day-old rice and a very hot wok in small batches.

Can I make it without a wok?

Yes — use your largest, heaviest skillet, get it very hot, and cook in batches so you don’t crowd the pan.

Variations & substitutions

Yangzhou Fried Rice is wonderfully versatile, allowing for creative swaps while maintaining its core appeal. Here are some real, expert-approved substitutions to tailor it to your pantry or preference:
  • Proteins: Instead of char siu (Chinese BBQ pork), use 1 cup of diced cooked chicken breast or thigh, or 1 cup of diced ham. For the shrimp, bay scallops or calamari rings can be used, or simply increase the amount of char siu/chicken. For a vegetarian option, omit the meat and shrimp, and add 1 cup of firm tofu (pressed, diced, and pan-fried until golden brown) along with an extra egg.
  • Vegetables: While peas and carrots are classic, feel free to swap or add. Try 1/2 cup corn kernels, 1/2 cup finely diced green beans, or 1/4 cup rehydrated and sliced dried shiitake mushrooms for a deeper umami. A handful of chopped bok choy or baby spinach can be stirred in at the very end until just wilted for a fresh green element.
  • Aromatics: If you don’t have fresh ginger, a pinch (1/4 teaspoon) of ground ginger can be used in a pinch, though fresh is always superior. For a milder onion flavor, finely diced shallots can replace part of the scallions.
  • Flavor Boosters: For an extra layer of savory depth, add 1 teaspoon of oyster sauce (or vegetarian oyster sauce) along with the light soy sauce. A tiny dash (1/2 teaspoon) of dark soy sauce can be added for a richer color without significantly altering the flavor profile. For a subtle kick, a drizzle of chili oil or a pinch of white pepper can be added at the very end.

What to serve with it

Yangzhou Fried Rice is a deliciously complete meal in itself, offering a balanced blend of protein, carbohydrates, and vegetables. However, it pairs beautifully with lighter, complementary dishes that cleanse the palate, add a different texture, or enhance the overall Chinese dining experience. Think about contrasting flavors and textures to create a truly satisfying spread.
  • Hot and Sour Soup: Its tangy, spicy, and savory notes provide a wonderful contrast to the fried rice.
  • Egg Drop Soup: A light, comforting, and simple soup that balances the richness of the fried rice.
  • Steamed Garlic Gai Lan (Chinese Broccoli): Crisp-tender greens with a hint of garlic offer a refreshing, healthy counterpoint.
  • Crispy Spring Rolls or Egg Rolls: Add a delightful crunch and a different flavor profile.
  • Pan-Fried Potstickers (Guo Tie): Savory dumplings provide another textural and flavor dimension.
  • Lightly Steamed Fish with Ginger and Scallions: A delicate, clean-tasting protein option that won’t overpower the fried rice.
  • Cucumber Salad with Sesame Dressing: A cool, tangy, and refreshing side to cut through the richness.

Make ahead, storage & reheating

Efficiency is key for great fried rice, and much of the prep can be done in advance. Proper storage and reheating ensure your leftovers are just as delicious as the first serving.
  • Rice Preparation (Make Ahead): The most crucial step is using cold, day-old rice. Cook 2-3 cups of long-grain white rice (Jasmine is ideal) 1 day in advance. Once cooked, spread it thinly on a baking sheet to cool quickly, then refrigerate uncovered for at least 6-8 hours, or up to 2 days, to thoroughly dry out the grains. This prevents mushy fried rice.
  • Ingredient Prep (Make Ahead): Dice your char siu, peel and devein shrimp, and chop all vegetables (carrots, peas, scallions) up to 24 hours ahead. Store each ingredient separately in airtight containers in the refrigerator. Whisk eggs just before you’re ready to cook.
  • Storage (Cooked Fried Rice): Allow the fried rice to cool completely (within 1-2 hours) before transferring it to an airtight container. Store in the refrigerator for up to 3-4 days. For longer storage, freeze the cooled fried rice in a freezer-safe bag or container for up to 1 month. Label with the date.
  • Reheating (From Refrigerator):
    • Stovetop (Recommended): Heat 1-2 teaspoons of neutral, high-smoke-point oil (like canola or grapeseed) in a non-stick pan or wok over medium-high heat. Add the desired portion of fried rice, breaking up any clumps with your spatula. Stir-fry for 5-7 minutes, tossing frequently, until heated through and the grains are slightly crispy again. A splash of water (1 tablespoon per serving) can help reintroduce moisture if the rice seems too dry.
    • Microwave: Place a single serving in a microwave-safe bowl. Cover loosely with a damp paper towel to help retain moisture. Microwave on high for 1-2 minutes, stirring halfway, until piping hot. While convenient, this method may not achieve the same crispy texture as stovetop reheating.
  • Reheating (From Freezer): Thaw frozen fried rice overnight in the refrigerator. Once thawed, reheat using the stovetop or microwave methods described above. Stovetop reheating is highly recommended for best texture.

Common mistakes to avoid

Even experienced cooks can stumble with fried rice. Avoiding these common pitfalls will elevate your Yangzhou Fried Rice from good to outstanding.
  • Using Freshly Cooked, Warm Rice: This is the cardinal sin of fried rice. Warm, moist rice will steam and clump, resulting in a soggy, gummy texture instead of distinct, fluffy grains. Always use cold, day-old rice that has been thoroughly dried in the refrigerator.
  • Overcrowding the Wok (or Pan): Adding too many ingredients at once drastically lowers the temperature of your cooking surface. This causes ingredients to steam rather than fry, leading to a watery, bland, and soggy dish. Cook in batches if necessary, especially if you’re not using a large, high-powered wok.
  • Insufficient Heat: Fried rice demands high heat. Your wok or pan should be smoking hot before you add oil, and maintain that high temperature throughout the cooking process. Low heat will result in ingredients simmering in their own juices instead of developing that characteristic “wok hei” (breath of the wok) and crispy texture.
  • Adding Sauces Too Early: Soy sauce and other liquid seasonings can burn quickly at high temperatures and also introduce moisture that can make the rice soft. Add them towards the end of the cooking process, after the rice and other ingredients are properly fried and heated through.
  • Skipping Mise en Place: Fried rice cooks incredibly fast, often in just minutes. If your ingredients aren’t prepped, chopped, and measured out *before* you start cooking, you’ll be scrambling, leading to unevenly cooked or burnt components. Have everything ready and within arm’s reach.

More questions

Why is day-old rice essential for perfect fried rice?

Day-old, refrigerated rice loses a significant amount of its moisture content, making the individual grains firmer and less sticky. This dryness is absolutely crucial for achieving that desirable loose, distinct grain texture rather than a mushy, clumped mess when stir-fried at high heat. Freshly cooked rice still holds too much water, which will steam in the wok, preventing proper frying and absorption of flavors.

What’s the best oil to use for fried rice?

A neutral, high-smoke-point oil is best for fried rice. Canola, grapeseed, peanut, or sunflower oil are excellent choices. Their mild flavor won’t overpower the delicate balance of ingredients in Yangzhou Fried Rice, and their high smoke point allows you to achieve the necessary searing heat and “wok hei” without burning the oil and imparting off-flavors. Avoid olive oil or butter, as their low smoke points will cause them to burn quickly.

How do I get those distinct, non-clumpy grains of rice?

Beyond using dry, day-old rice, the key to distinct, non-clumpy grains lies in three techniques: high heat, proper stirring, and not overcrowding your wok. Ensure your wok or pan is screaming hot before adding oil. Add the rice in manageable portions, breaking up any clumps with the back of your spatula or wok ladle as soon as it hits the hot surface. Keep the rice moving constantly, tossing and stirring vigorously, to ensure even exposure to heat and allow moisture to evaporate quickly, preventing sticking and promoting individual grain separation. If your rice still clumps, try coating the cold rice lightly with a teaspoon of oil before adding it to the wok.
May 25, 2026 0 comments
0 FacebookTwitterPinterestEmail
Spicy Sichuan Kung Pao chicken stir-fry, featuring peanuts, dried chilies, and green onions.
ChineseRecipes

Sichuan Kung Pao Chicken

by D L May 24, 2026
written by D L

Watch how to make it

Kung Pao chicken (gong bao ji ding) is a Sichuan classic built on the signature “ma la” tingle of Sichuan peppercorns and dried chilies, balanced by a sweet-sour-savory sauce and crunchy peanuts. Restaurant versions are often dumbed down — this one keeps the numbing heat that makes it special.

We dialed the chili-to-peppercorn ratio for real ma la character without being painful.

Why this recipe works

  • Velveting the chicken (a cornstarch-and-soy marinade) keeps it silky and tender.
  • Toasting whole dried chilies and Sichuan peppercorns in oil builds the aromatic base.
  • A pre-mixed sauce means everything comes together fast over high heat.

Key ingredients

Diced chicken, dried red chilies, Sichuan peppercorns, soy sauce, Chinese black vinegar, sugar, garlic, ginger, scallions and roasted peanuts. A good wok makes the high-heat stir-fry far easier.

Tips from our kitchen

  • Don’t burn the peppercorns — toast just until fragrant or they turn bitter.
  • Have the sauce mixed and aromatics chopped before heating the wok.
  • Add peanuts at the very end so they stay crunchy.

Spicy Sichuan Kung Pao chicken stir-fry, featuring peanuts, dried chilies, and green onions.

Sichuan Kung Pao Chicken

Print Recipe Pin Recipe
Prep Time 20 minutes mins
Cook Time 8 minutes mins
Total Time 28 minutes mins
Servings: 2 servings
Course: Main Course
Cuisine: Chinese
Ingredients Method Notes

Ingredients
  

  • 300 g chicken diced
  • 1 tbsp cornstarch
  • 2 tbsp soy sauce
  • 8 dried red chilies
  • 1 tsp Sichuan peppercorns
  • 1 tbsp black vinegar
  • 1 tbsp sugar
  • 3 cloves garlic minced
  • 2 scallions cut
  • 3 tbsp roasted peanuts

Method
 

  1. Marinate (velvet) diced chicken in cornstarch and 1 tbsp soy sauce, 15 min.
  2. Mix remaining soy, vinegar and sugar into a sauce.
  3. Toast dried chilies and Sichuan peppercorns in hot oil until fragrant.
  4. Add chicken and stir-fry until just cooked.
  5. Add garlic, scallions and the sauce; toss to coat.
  6. Stir in peanuts off the heat and serve.

Notes

Do not burn the peppercorns or they turn bitter.

Frequently asked questions

What are Sichuan peppercorns?

Not actually pepper — they’re dried husks that create a citrusy, numbing tingle (ma) on the tongue. They’re essential to authentic Kung Pao.

How spicy is it?

You control it. The dried chilies are mostly for aroma; remove the seeds or use fewer for a milder dish.

Can I use chicken breast?

Yes, but velvet it well. Thigh is more forgiving and stays juicier under high-heat stir-frying.

Variations & substitutions

While the classic Sichuan Kung Pao Chicken is a masterpiece on its own, its robust flavor profile makes it surprisingly adaptable. Here are some expert-approved ways to tweak the recipe without sacrificing its soul:

  • Protein Swaps: For a vegetarian twist, substitute 1 lb extra-firm tofu, pressed and cut into 1-inch cubes, then lightly fried until golden before adding to the wok. Shrimp (1 lb, peeled and deveined) can replace chicken; marinate for just 15 minutes and cook quickly (1-2 minutes per side) to prevent toughness. Thinly sliced pork tenderloin (1 lb) also works beautifully, benefiting from the same velveting technique as chicken.
  • Vegetable Additions: While not traditional, you can introduce a pop of color and texture with 1 cup of diced red bell pepper or 1/2 cup of sliced bamboo shoots, added during the last minute of stir-frying to maintain a slight crunch.
  • Nut Alternatives: If peanuts aren’t your preference or you have an allergy, roasted cashews make an excellent substitute, offering a similar crunch and richness. Add them at the very end, just before serving.
  • Spice Level Adjustments: To dial down the heat, reduce the number of dried chilies or remove their seeds entirely before adding. For an extra kick, a drizzle of homemade chili oil (Lao Gan Ma is a great store-bought option) can be added just before serving.
  • Sichuan Peppercorn Intensity: If you find the “ma la” (numbing) sensation too intense, reduce the quantity of Sichuan peppercorns to 1/2 teaspoon. If you’re struggling to find them, a tiny pinch of freshly ground black pepper combined with a whisper of lemon zest can offer a faint echo of the unique zing, though it won’t replicate the true numbing quality.

What to serve with it

Kung Pao Chicken is a symphony of spicy, savory, tangy, and subtly sweet flavors, with that signature numbing sensation. To truly appreciate its complexity, it’s best paired with dishes that complement its richness and provide a cooling contrast. Think simple, clean flavors that allow the Kung Pao to shine as the star of your meal.

  • Steamed Jasmine Rice: An absolute essential. Its neutral flavor and fluffy texture are perfect for soaking up the delicious sauce and balancing the heat.
  • Garlic Stir-fried Gai Lan (Chinese Broccoli): Lightly blanched and quickly stir-fried with garlic, this vibrant green offers a fresh, slightly bitter counterpoint that cleanses the palate.
  • Smashed Cucumber Salad (Pai Huang Gua): A classic Sichuan appetizer. Crisp cucumbers smashed and dressed with garlic, vinegar, and a touch of chili oil provide a refreshing, tangy, and cooling contrast to the richness of the chicken.
  • Simple Egg Drop Soup: A light, comforting soup that offers a gentle, savory warmth without competing with the main dish’s bold flavors.
  • Blanched Asparagus or Bok Choy: Lightly cooked and seasoned with a pinch of salt, these vegetables offer a crisp, fresh element that balances the meal.

Make ahead, storage & reheating

Savvy meal prep can make weeknight Kung Pao a breeze, and knowing how to store and reheat ensures every bite is as good as the first.

  • Make Ahead: The sauce can be mixed and stored in an airtight container in the refrigerator for up to 3 days. The chicken can be velveted and marinated up to 4 hours in advance, kept covered in the fridge. Vegetables can be chopped and prepped a day ahead. This streamlines the stir-frying process to just minutes.
  • Storage: Once cooked, allow the Kung Pao Chicken to cool completely before transferring it to an airtight container. It will keep beautifully in the refrigerator for 3-4 days. While technically freezable, the texture of the chicken (which can become a bit rubbery) and peanuts (which can lose their crispness) isn’t ideal after thawing. If you must freeze, it’s best for up to 1 month in an airtight, freezer-safe container, but expect a slight compromise in quality.
  • Reheating: For best results, reheat on the stovetop. Transfer the leftovers to a wok or large skillet over medium heat. Add a splash (1-2 tablespoons) of water or chicken broth to help loosen the sauce and prevent drying. Stir-fry gently until heated through, about 5-7 minutes. Avoid high heat, which can overcook the chicken. Reheating in the microwave is also an option: cover the dish and heat on medium power, stirring every minute, until hot.

Common mistakes to avoid

Even seasoned cooks can stumble when making a dish as nuanced as Kung Pao Chicken. Steer clear of these common pitfalls to ensure your dish is authentic and delicious every time:

  • Overcooking the Chicken: The velveting technique is designed to keep the chicken incredibly tender. Over-stir-frying, especially after adding the sauce, will reverse this effect, resulting in dry, rubbery chicken. Cook just until opaque and the sauce has thickened.
  • Insufficiently Toasting Aromatics and Chilies: Don’t rush this step! The dried chilies and Sichuan peppercorns need a minute or two in hot oil to bloom and release their fragrant, spicy, and numbing oils. If they don’t darken slightly and become aromatic, your dish will lack depth.
  • Using Unroasted Peanuts: Raw peanuts will be soft and absorb too much moisture, becoming soggy. Always use pre-roasted, unsalted peanuts, or blanch and fry raw peanuts yourself until golden and crisp. Add them at the very end to maintain their crunch.
  • Skimping on Sichuan Peppercorns: This is the soul of authentic Kung Pao. Without enough freshly ground Sichuan peppercorns, you miss the signature “ma la” (numbing and spicy) sensation that defines the dish. Don’t confuse them with black peppercorns; their flavor is unique.
  • Crowding the Wok: A common stir-fry error. Adding too much chicken or too many vegetables at once lowers the wok’s temperature, leading to steaming instead of searing. This results in bland, watery ingredients rather than beautifully caramelized ones. Cook in batches if your wok isn’t large enough.

More questions

Can I make Sichuan Kung Pao Chicken less spicy?

Absolutely! The spice level is quite adjustable. To reduce the heat, simply use fewer dried chilies. For a very mild version, you can even remove the seeds from the chilies before adding them, as much of the capsaicin (the heat compound) resides there. You can also omit the chilies entirely and still enjoy the complex flavors, especially the unique numbing sensation from the Sichuan peppercorns.

What’s the main difference between authentic Sichuan Kung Pao and Americanized versions?

The differences are significant! Authentic Sichuan Kung Pao emphasizes the “ma la” (numbing and spicy) sensation from a generous amount of Sichuan peppercorns and dried chilies, balanced by savory, tangy, and subtly sweet notes. It typically features chicken, peanuts, and green onions, with minimal other vegetables. Americanized versions often dial down the spice and the numbing quality, significantly increase the sweetness, and frequently include a wider array of vegetables like bell peppers, zucchini, and carrots. Cashews are also a common substitution for peanuts in Americanized versions.

How do I ensure my peanuts stay crispy in the dish?

The trick to crispy peanuts is twofold: first, start with good quality, roasted, unsalted peanuts (or blanch and fry raw peanuts yourself until golden brown and drain well). Second, and crucially, add them to the wok right at the very end of the cooking process, just before serving. This minimizes their exposure to the sauce and heat, preserving their delightful crunch. If you add them too early, they’ll absorb moisture and become soft.

May 24, 2026 0 comments
0 FacebookTwitterPinterestEmail

Recent Posts

  • Vietnamese Fresh Spring Rolls (Goi Cuon)
  • Chinese Beef and Broccoli
  • Japanese Chicken Katsu
  • Korean Fried Chicken (Dakgangjeong)
  • Thai Basil Chicken (Pad Krapow Gai)

Categories

  • Chinese
  • Guides
  • Japanese
  • Korean
  • Recipes
  • Reviews
  • Thai
  • Vietnamese
  • English
    • Français(French)
    • Deutsch(German)
    • 日本語(Japanese)
    • 한국어(Korean)
    • Español(Spanish)
    • Tiếng Việt(Vietnamese)

Get tested recipes in your inbox

Join AIO Kitchen — weekly tested recipes, smart guides & honest reviews. No spam.

Check your inbox to confirm your subscription. Thank you!

  • Facebook
  • Instagram
  • Pinterest
  • About AIO Kitchen
  • Affiliate Disclosure
  • Chinese Recipes — The Complete Guide
  • Contact
  • Disclaimer
  • Japanese Recipes — The Complete Guide
  • Korean Recipes — The Complete Guide
  • Privacy Policy
  • Terms of Use
  • Thai Recipes — The Complete Guide
  • Vietnamese Recipes — The Complete Guide

© 2026 AIO Kitchen. All Rights Reserved.


Back To Top
AIO Kitchen
  • Home
  • Recipes
  • Guides
  • Reviews
  • About AIO Kitchen
  • Contact
  • Cuisines
    • Vietnamese
    • Thai
    • Korean
    • Japanese
    • Chinese
  • English
    • Français
    • Deutsch
    • 日本語
    • 한국어
    • Español
    • Tiếng Việt