AIO Kitchen
  • Home
  • Recipes
  • Guides
  • Reviews
  • About AIO Kitchen
  • Contact
  • Cuisines
    • Vietnamese
    • Thai
    • Korean
    • Japanese
    • Chinese
  • English
    • Français
    • Deutsch
    • 日本語
    • 한국어
    • Español
    • Tiếng Việt
AIO Kitchen
Tested recipes · smart guides · honest reviews
Home - Japanese
Category:

Japanese

Authentic Japanese recipes — ramen, chicken katsu, teriyaki and more, made approachable with clear, tested instructions.

Watch: Japanese Recipe Videos

Japanese Chicken Katsu
JapaneseRecipes

Japanese Chicken Katsu

by D L May 25, 2026
written by D L

Watch how to make it

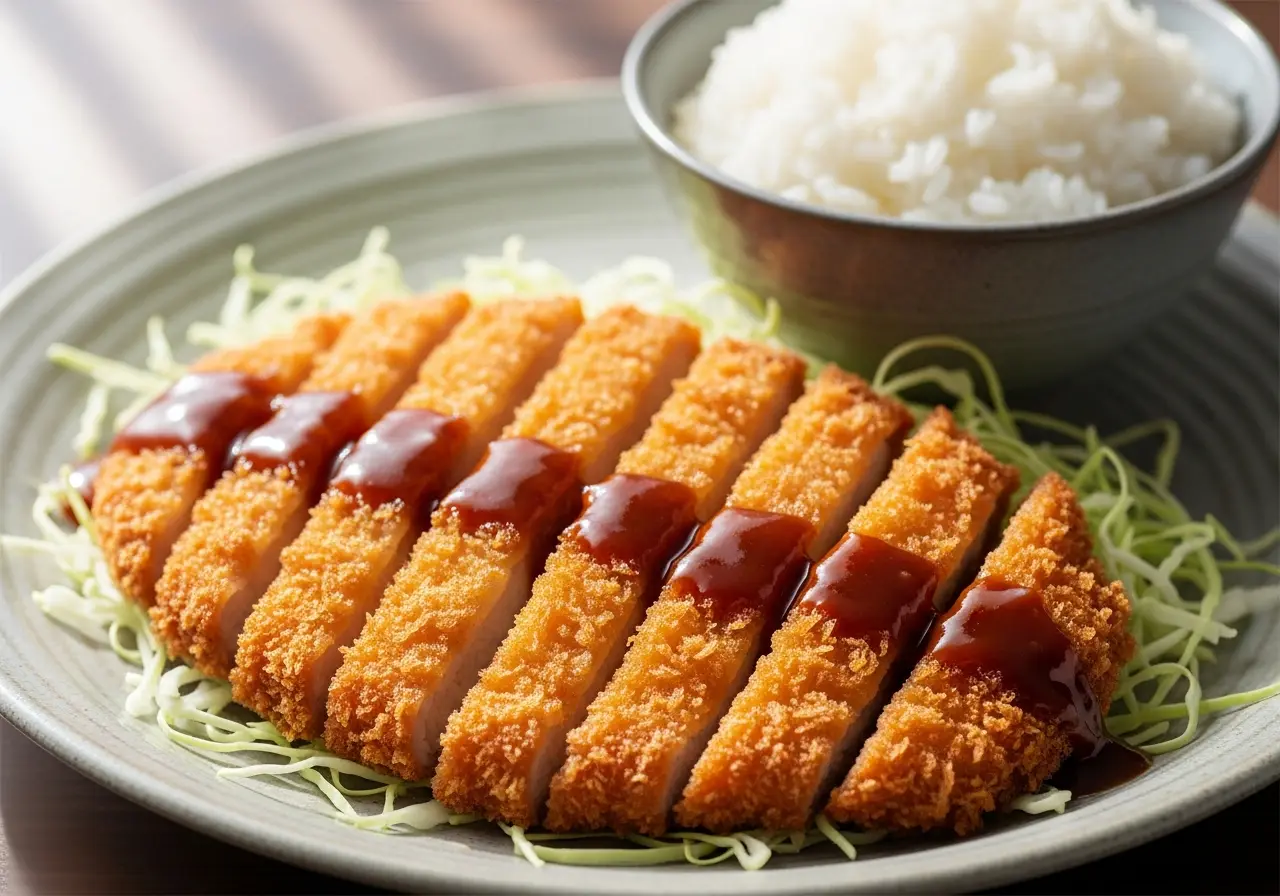
Chicken katsu is the everyday Japanese comfort food that turns a plain chicken breast into something special: pounded thin, coated in airy panko, and shallow-fried until impossibly crisp. Sliced over rice with shredded cabbage and a drizzle of tonkatsu sauce, it’s a 25-minute dinner that never disappoints.

Why this recipe works

  • Pound it even — a uniform thickness means the cutlet cooks through before the crust burns.
  • Panko, not breadcrumbs — the coarse Japanese crumbs fry up lighter and crunchier.
  • Three-stage breading — flour, egg, panko — locks the crust on so it doesn’t slide off.

Key ingredients

Chicken breast, flour, egg, panko breadcrumbs, and tonkatsu sauce (a sweet-savory Worcestershire-style sauce thickened with fruit). Full amounts in the recipe card below.

Tips from our kitchen

  • Press the panko on firmly so it adheres in a thick, even layer.
  • Keep the oil at 170–180°C; too cool and the crust soaks up oil, too hot and it browns before cooking through.
  • Rest the cutlet on a rack, not paper towel, so the bottom stays crisp.

Frequently asked questions

What is tonkatsu sauce?

A thick, sweet-and-tangy Japanese sauce similar to a fruity Worcestershire or HP sauce. You can buy it (Bull-Dog brand is classic) or mix ketchup, Worcestershire, soy and a little sugar.

Can I use chicken thigh?

Yes — boneless thigh stays juicier. Pound it to an even thickness and fry a minute longer.

How do I make katsu curry?

Serve the sliced katsu over rice and ladle Japanese curry sauce alongside — it’s the same cutlet, different finish.

Japanese Chicken Katsu

Japanese Chicken Katsu

Print Recipe Pin Recipe
Prep Time 15 minutes mins
Cook Time 10 minutes mins
Total Time 25 minutes mins
Servings: 2 servings
Course: Main Course
Cuisine: Japanese
Ingredients Method Notes

Ingredients
  

  • 2 chicken breasts
  • 1/2 cup flour
  • 2 eggs beaten
  • 1.5 cups panko breadcrumbs
  • 1 tsp salt
  • 1/2 tsp white pepper
  • neutral oil for shallow frying
  • 4 tbsp tonkatsu sauce
  • 2 cups steamed rice to serve
  • 2 cups shredded cabbage to serve

Method
 

  1. Butterfly each chicken breast and pound to an even 1.5 cm thickness; season with salt and pepper.
  2. Set up three bowls: flour, beaten egg, panko. Coat each cutlet in flour, then egg, then press firmly into panko.
  3. Heat 1 cm of oil to 175°C in a wide pan.
  4. Fry the cutlets 3–4 minutes per side until deep golden and cooked through.
  5. Rest on a wire rack for 2 minutes, then slice into strips.
  6. Serve over rice with shredded cabbage and tonkatsu sauce.

Notes

No tonkatsu sauce? Mix 3 tbsp ketchup, 1 tbsp Worcestershire, 1 tsp soy sauce and 1 tsp sugar.

Variations & substitutions

  • Chicken Cut: While chicken breast is traditional, boneless, skinless chicken thighs can be used for a juicier, richer result. Pound them to an even thickness of about 1/2 inch.
  • Gluten-Free: For a gluten-free katsu, use gluten-free panko breadcrumbs and a gluten-free all-purpose flour blend for dredging. The rest of the process remains the same.
  • Seasoning Boost: Enhance the flavor by adding a pinch of garlic powder and/or white pepper to your flour dredge. A dash of grated fresh ginger in the egg wash can also add a subtle aromatic note.
  • Frying Oil: Canola, vegetable, or grapeseed oil are excellent neutral-flavored oils for deep frying. Avoid olive oil due to its lower smoke point and distinct flavor.
  • Sauce Alternatives: While Tonkatsu sauce is classic, consider serving with a bright ponzu sauce for a lighter, tangier profile, or alongside a Japanese curry for Chicken Katsu Curry.
  • Non-Chicken Katsu: This breading technique can be applied to other proteins! Try pork loin (Tonkatsu), firm white fish fillets (Fish Katsu), or even firm tofu slices (Tofu Katsu).

What to serve with it

A well-rounded Japanese meal is all about balance, and Chicken Katsu is no exception. Traditionally, it’s served as the star of a set meal (teishoku), accompanied by an array of complementary dishes that cut through its richness and offer textural contrast. Here are the essential pairings for an authentic experience:

  • Steamed Short-Grain Rice: Absolutely non-negotiable. The fluffy, slightly sticky rice provides a perfect neutral base and absorbs the sauce beautifully.
  • Finely Shredded Cabbage: A mound of crisp, raw shredded cabbage is crucial. Its freshness and slight bitterness cut through the richness of the fried chicken. A light dressing like yuzu vinaigrette or simply a squeeze of lemon is often served alongside.
  • Miso Soup: A warm, savory bowl of miso soup (often with tofu and wakame seaweed) provides umami depth and hydration, balancing the meal.
  • Tonkatsu Sauce: The quintessential sweet and tangy sauce made from fruits and vegetables. You can buy good quality bottled versions or make your own from scratch.
  • Japanese Pickles (Tsukemono): Small portions of pickled ginger (gari), daikon, or cucumber add a refreshing, tangy crunch that cleanses the palate.
  • Japanese Potato Salad: Creamy, slightly sweet, and often studded with cucumber and ham, this is a popular side dish that adds another layer of comfort.

Make ahead, storage & reheating

  • Make Ahead (Pre-Frying): You can pound the chicken and set up your dredging station up to an hour in advance. However, for the crispiest result, it’s best to dredge the chicken in panko just before frying. If you must dredge ahead, place the breaded cutlets on a wire rack over a baking sheet, cover loosely with plastic wrap, and refrigerate for no more than 2-3 hours to prevent the panko from becoming soggy.
  • Storage (Cooked Katsu): Once cooked and cooled, transfer the katsu to an airtight container. It will keep in the refrigerator for up to 3-4 days. For longer storage, wrap individual cooled cutlets tightly in plastic wrap, then aluminum foil, and place them in a freezer-safe bag. Freeze for up to 1 month.
  • Reheating (For Crispness): The key to reheating katsu is to restore its crisp exterior without drying out the chicken. Avoid the microwave, which will make it soggy.
    • Oven Method: Preheat your oven to 375°F (190°C). Place the katsu on a wire rack set over a baking sheet (this allows air circulation for crispness). Reheat for 15-20 minutes, flipping halfway, until heated through and crisp.
    • Air Fryer Method: Preheat your air fryer to 350°F (175°C). Place the katsu in a single layer in the basket. Cook for 8-10 minutes, flipping halfway, until golden and crisp.
    • From Frozen: Reheat frozen katsu directly in the oven or air fryer, adding about 10-15 minutes to the cooking time, ensuring it reaches an internal temperature of 165°F (74°C).

Common mistakes to avoid

  • Not Pounding Chicken Evenly: If your chicken breast isn’t pounded to a uniform 1/2-inch thickness, thinner parts will dry out while thicker sections remain undercooked. Use a meat mallet or rolling pin and pound between two sheets of plastic wrap.
  • Insufficient Oil Temperature: Frying in oil that’s too cool (below 325°F/160°C) results in greasy, soggy katsu because the breading absorbs too much oil before it can crisp up. Use a thermometer to maintain a steady temperature between 325-350°F (160-175°C).
  • Overcrowding the Pan: Adding too many cutlets at once drastically drops the oil temperature, leading to the same greasy, soggy problem. Fry in batches, leaving ample space between each piece, and allow the oil to recover its temperature between batches.
  • Not Seasoning at Each Stage: Bland katsu is a common pitfall. Season the chicken itself with salt and pepper before dredging, and add a pinch of salt to your flour and egg wash. This builds layers of flavor.
  • Cutting Immediately After Frying: Like any cooked meat, katsu needs to rest for 2-3 minutes after coming out of the oil. This allows the juices to redistribute throughout the chicken, resulting in a more tender and moist interior. Cutting too soon will cause the juices to run out, leaving the chicken dry.
  • Using Regular Breadcrumbs: While you can, regular breadcrumbs will not yield the same light, airy, and super-crispy texture as Japanese panko. Panko’s larger, flakier structure is key to authentic katsu.

More questions

Why is my Chicken Katsu soggy?

Soggy katsu is usually a result of one or more issues: 1) The oil temperature was too low, causing the breading to absorb oil rather than crisp up. 2) You overcrowded the pan, dropping the oil temperature significantly. 3) The katsu wasn’t drained properly on a wire rack after frying. 4) It was covered immediately after frying, trapping steam and making it soggy. Ensure proper oil temperature (325-350°F/160-175°C), fry in batches, and drain on a wire rack.

Can I bake or air fry Chicken Katsu instead of deep frying?

Yes, you can, but be aware the texture will not be identical to deep-fried katsu; it will be less rich and slightly different in crispness. For baking, preheat your oven to 400°F (200°C), spray the breaded cutlets generously with cooking oil, and bake for 20-25 minutes, flipping halfway, until golden brown and cooked through. For air frying, preheat to 375°F (190°C), spray with oil, and air fry for 12-15 minutes, flipping halfway, until crisp.

What’s the best chicken cut for katsu?

Boneless, skinless chicken breast is the most traditional choice for Chicken Katsu due to its lean texture and ease of pounding into a uniform shape. However, boneless, skinless chicken thighs are an excellent alternative if you prefer a juicier, more flavorful, and slightly richer katsu. Whichever you choose, ensure it’s pounded to an even 1/2-inch thickness for consistent cooking.

May 25, 2026 0 comments
0 FacebookTwitterPinterestEmail
A steaming bowl of homemade Japanese Shoyu Ramen, topped with pork, egg, and nori.
JapaneseRecipes

Japanese Shoyu Ramen at Home

by D L May 25, 2026
written by D L

Watch how to make it

A great bowl of shoyu ramen is all about layers: a savory soy-based tare, a clear-but-rich broth, springy noodles, and toppings like soft-boiled egg, chashu pork and nori. You don’t need a 12-hour broth to eat well at home — this approachable version comes together in an evening.

Why this recipe works

  • Tare + broth, kept separate until serving — the classic ramen structure that lets you control seasoning.
  • A quick chicken-and-kombu broth delivers depth without all-day simmering.
  • Jammy marinated egg (ajitama) made ahead takes the bowl from good to great.

Key ingredients

Fresh ramen noodles, soy sauce, mirin, kombu, chicken, eggs, chashu pork, scallions and nori. See the recipe card for the full method.

Tips from our kitchen

  • Marinate the eggs the night before for the best jammy yolk and flavour.
  • Cook noodles separately and add to the bowl last so they don’t go soft.
  • Warm the bowls — ramen cools fast.

A steaming bowl of homemade Japanese Shoyu Ramen, topped with pork, egg, and nori.

Japanese Shoyu Ramen

Print Recipe Pin Recipe
Prep Time 20 minutes mins
Cook Time 30 minutes mins
Total Time 50 minutes mins
Servings: 2 bowls
Course: Main Course
Cuisine: Japanese
Ingredients Method Notes

Ingredients
  

  • 200 g fresh ramen noodles
  • 4 tbsp soy sauce
  • 2 tbsp mirin
  • 1 piece kombu
  • 300 g chicken
  • 2 eggs
  • 4 slices chashu pork
  • 2 scallions
  • 2 sheets nori

Method
 

  1. Make the tare: warm soy sauce and mirin together; divide between two bowls.
  2. Simmer chicken and kombu in water 30 minutes for a quick broth; strain.
  3. Soft-boil eggs 6.5 minutes, peel, and marinate in a little soy + mirin.
  4. Cook the noodles separately per package; drain well.
  5. Add noodles to the tare, pour over hot broth, and top with egg, chashu, scallions and nori.

Notes

Marinate the eggs ahead for the best jammy yolk.

Frequently asked questions

What’s tare?

Tare is the concentrated seasoning base (here soy + mirin) that sits in the bottom of the bowl; the broth is poured over it. It’s what makes a bowl “shoyu” ramen.

Can I use instant noodles?

Fresh ramen noodles are best, but good dried ramen works. Skip the seasoning packet and use your own tare and broth.

Variations & substitutions

While this recipe provides a fantastic baseline for a classic Shoyu Ramen, the beauty of home cooking lies in its adaptability. Don’t be afraid to experiment once you’ve mastered the fundamentals. Here are some expert-approved swaps and variations:

  • Noodle Nuances: Can’t find fresh ramen noodles? High-quality dried ramen noodles (often labeled ‘chuka soba’) are a good substitute; just be sure to follow package directions for cooking time precisely. For a different texture, try thicker, chewier udon noodles (though this moves away from traditional shoyu ramen style) or even thin spaghetti in a pinch, boiled with a pinch of baking soda for alkalinity.
  • Broth Boosters: For a richer, deeper umami, consider adding a small piece of kombu (dried kelp) and a handful of katsuobushi (bonito flakes) to your broth base while simmering, then strain. A tablespoon of red or white miso paste dissolved in a little hot broth before adding to your bowl can also add a delightful layer of complexity, transforming it into a shoyu-miso hybrid.
  • Protein Play: Instead of chashu, try thinly sliced pan-seared chicken breast or thigh, marinated in a similar soy-ginger mixture. For a vegetarian option, pan-fried or baked marinated tofu or tempeh slices work beautifully, absorbing the broth’s flavor.
  • Vegetable Ventures: Swap out spinach for blanched bok choy, bean sprouts, or thinly sliced napa cabbage. A handful of sweet corn kernels (fresh or frozen) adds a burst of color and sweetness, while a sprinkle of finely chopped scallions or a drizzle of chili oil can replace the green onions for a different aromatic kick.
  • Tare Twists: Experiment with different types of shoyu (soy sauce). A blend of light and dark soy sauce can offer a more nuanced flavor profile. For an extra layer of sweetness and depth, a touch of oyster sauce or a dash of black vinegar can be interesting additions to your tare, though use sparingly to maintain balance.

What to serve with it

Ramen is often a meal in itself, but in Japan, it’s common to enjoy it with a few complementary side dishes that balance the rich broth and hearty noodles. Think of lighter, often fried, or pickled accompaniments that offer textural contrast or a refreshing palate cleanse. Here are some authentic pairings that elevate the ramen experience:

  • Gyoza (Pan-fried Dumplings): The crispy bottoms and savory pork and vegetable filling of gyoza make them a classic ramen companion. Their umami complements the broth without overpowering it.
  • Karaage (Japanese Fried Chicken): Juicy, marinated, and perfectly crispy fried chicken offers a delightful textural contrast and a burst of savory flavor. A squeeze of lemon brightens the richness.
  • Edamame: Simple, steamed edamame pods, lightly salted, provide a fresh, slightly sweet, and healthy counterpoint to the rich ramen. They’re also great for a light appetizer.
  • Takuan (Pickled Daikon Radish): The crisp texture and tangy, slightly sweet flavor of takuan offer a refreshing palate cleanser between spoonfuls of ramen, cutting through the richness.
  • Chahan (Japanese Fried Rice): For a truly hearty meal, a small bowl of Japanese-style fried rice, often made with leftover chashu or simple vegetables, is a popular pairing.

Make ahead, storage & reheating

The key to excellent homemade ramen is assembling it fresh, but many components can be prepared in advance to make weeknight ramen dreams a reality. Proper storage and reheating ensure quality and safety.

  • Broth: The broth is your best friend for make-ahead. Prepare it fully, cool completely, then store in an airtight container in the refrigerator for up to 3-4 days. For longer storage, freeze in individual portions for up to 3 months. Reheat gently over medium heat, stirring occasionally, until simmering. Do not boil vigorously, which can make it cloudy.
  • Tare (Seasoning Concentrate): Your tare is quite stable. Store it in a sealed jar or container in the refrigerator for several weeks to even months, depending on ingredients. As it’s a concentrate, it’s less prone to spoilage.
  • Chashu (Pork Belly): Once cooked and cooled, store the entire roll or sliced portions in its braising liquid in an airtight container in the refrigerator for up to 4 days. For longer storage, freeze individual slices or the whole roll (without liquid, or with just enough to coat) for up to 1 month. Reheat sliced chashu gently in a pan with a splash of its braising liquid, or dip briefly into the hot ramen broth just before serving.
  • Aroma Oil: Store your finished aroma oil in a clean, airtight bottle or jar at room temperature for up to 2 weeks, or in the refrigerator for longer (it might solidify but will liquefy when warmed).
  • Ajitama (Marinated Eggs): Store peeled, marinated eggs in their liquid in an airtight container in the refrigerator for up to 3 days. They are best served chilled or at room temperature.
  • Noodles & Vegetables: These are best prepared fresh just before serving. Pre-cooked noodles can become gummy. If absolutely necessary, cook noodles al dente, rinse immediately with cold water, toss with a tiny bit of neutral oil, and store in the fridge for no more than 1 day. Reheat by dipping into boiling water for 15-30 seconds. Most vegetables (spinach, scallions) should be prepped but added fresh.

Common mistakes to avoid

Even seasoned cooks can stumble when making ramen. Avoiding these common pitfalls will significantly improve your homemade bowl:

  • Overcooking the Noodles: This is perhaps the most common ramen sin. Mushy, soggy noodles ruin the entire experience. Ramen noodles cook very quickly, often in 60-90 seconds. Always cook them fresh, just before serving, and follow package directions precisely. A slight al dente bite is ideal.
  • Not Seasoning the Broth Properly (or at all): Simply making a stock isn’t enough. The tare is crucial. Without it, your broth will taste bland, no matter how rich your stock is. Add your tare to the bowl first, then the hot broth, allowing them to emulsify. Taste and adjust.
  • Using Cold Toppings: Adding cold chashu, eggs, or vegetables directly to your hot broth will significantly drop its temperature, resulting in a lukewarm bowl. Gently warm your chashu, and ensure other toppings are at least room temperature.
  • Assembling Too Early: Ramen is a dish meant to be eaten immediately upon assembly. If you let it sit, the noodles will absorb too much broth and become soggy, and the broth will cool down. Have all components ready, assemble quickly, and serve without delay.
  • Boiling the Broth Vigorously: While simmering is necessary, a rolling boil can emulsify fats in a way that makes your broth cloudy and can reduce it too quickly, altering its intended balance. Maintain a gentle simmer for clarity and flavor retention.

More questions

Can I use store-bought broth or stock?

Absolutely, especially for convenience! To elevate store-bought chicken or vegetable broth, simmer it with a piece of kombu (dried kelp) and a handful of katsuobushi (bonito flakes) for 15-20 minutes, then strain. This adds a crucial layer of umami. Alternatively, simply ensure your tare is robust and flavorful, as it will provide the primary seasoning for the broth.

What’s the secret to perfectly jammy ramen eggs (Ajitama)?

The key is precise timing and an immediate ice bath. Bring water to a rolling boil. Gently lower cold eggs into the boiling water. For a perfect jammy yolk, boil for exactly 6 minutes and 30 seconds for medium eggs, or 7 minutes for large eggs. Immediately transfer them to an ice bath to stop the cooking process. Peel carefully under cold running water, then marinate in your chashu braising liquid or a separate soy-mirin mixture for at least 6-12 hours.

What’s the single most important element for truly great homemade ramen?

While all components are important, the most critical element for a truly great bowl of ramen is the balance and synergy of the tare, aroma oil, and broth, combined with perfectly cooked, fresh noodles. Many focus solely on the broth, but without a well-balanced tare and a fragrant aroma oil, even the best broth will fall flat. The interplay of these three elements creates the depth and complexity ramen is famous for.

May 25, 2026 0 comments
0 FacebookTwitterPinterestEmail
Succulent pieces of glazed Japanese chicken teriyaki, served with a side of rice.
JapaneseRecipes

Japanese Chicken Teriyaki

by D L May 24, 2026
written by D L

Watch how to make it

Real chicken teriyaki is nothing like the gloopy, over-sweet takeout version. Authentic teriyaki is a glossy glaze of just four pantry ingredients — soy sauce, mirin, sake and sugar — reduced until it clings to pan-seared chicken. It’s a 20-minute weeknight dinner that tastes far better than its effort.

We tested this with thigh and breast; thigh wins for juiciness, but both work with the same glaze.

Why this recipe works

  • Sear skin-side down first for crisp skin and rendered fat to glaze in.
  • The 1:1:1:1 sauce ratio (soy : mirin : sake : sugar) is foolproof and balanced.
  • Reduce the glaze in the same pan so it picks up the chicken’s savory fond.

Key ingredients

Boneless chicken thighs, soy sauce, mirin, sake and sugar. That’s the entire glaze — no cornstarch, no bottled teriyaki needed. Serve over steamed rice with sesame seeds and scallions.

Tips from our kitchen

  • Pat the chicken dry before searing for the best browning.
  • Let the glaze bubble until it coats the back of a spoon, then turn the chicken to coat.
  • No sake? Substitute dry sherry or a splash of water plus extra mirin.

Succulent pieces of glazed Japanese chicken teriyaki, served with a side of rice.

Japanese Chicken Teriyaki

Print Recipe Pin Recipe
Prep Time 5 minutes mins
Cook Time 15 minutes mins
Total Time 20 minutes mins
Servings: 2 servings
Course: Main Course
Cuisine: Japanese
Ingredients Method Notes

Ingredients
  

  • 4 boneless chicken thighs
  • 3 tbsp soy sauce
  • 3 tbsp mirin
  • 3 tbsp sake
  • 1 tbsp sugar
  • 1 tsp sesame seeds
  • 2 scallions sliced

Method
 

  1. Pat chicken dry. Sear skin-side down in a dry pan until crisp and golden.
  2. Flip and cook through; remove excess fat.
  3. Mix soy, mirin, sake and sugar; pour into the pan.
  4. Simmer until the glaze coats the back of a spoon.
  5. Turn the chicken to coat in the glaze.
  6. Slice and serve over rice with sesame seeds and scallions.

Notes

Thigh stays juicier than breast. No sake? Use dry sherry.

Frequently asked questions

Thigh or breast?

Thigh stays juicier and is more forgiving. Use breast if you prefer leaner meat, but watch it closely so it doesn’t dry out.

What is mirin?

A sweet Japanese rice wine that gives teriyaki its shine and gentle sweetness. If unavailable, use a little sugar dissolved in rice vinegar as a rough substitute.

How do I get it glossy?

Reduce the sauce properly — the shine comes from the sugar and mirin concentrating, not from cornstarch.

Variations & Substitutions

While our classic Japanese Chicken Teriyaki recipe is perfected for flavor and texture, don’t hesitate to experiment with these expert-approved adjustments to suit your pantry or preferences:

  • Chicken Cut: While boneless, skin-on chicken thighs are king for juiciness and flavor, you can absolutely use boneless, skinless chicken breast. To prevent drying, consider brining the breast for 30 minutes in a 1.5% salt solution (1.5g salt per 100ml water) before cooking. Adjust cooking time accordingly, aiming for an internal temperature of 165°F (74°C).
  • Sweetener: For a slightly different depth of sweetness, substitute honey or light brown sugar for granulated sugar. Use 1 tablespoon of honey or 1.5 tablespoons of light brown sugar for every 1 tablespoon of granulated sugar.
  • Soy Sauce: For a gluten-free version, use tamari in place of regular soy sauce. If you’re watching sodium intake, opt for a low-sodium soy sauce and adjust seasoning later if needed.
  • Sake Alternative: If you don’t have sake, a dry sherry or even a dry white wine (like Sauvignon Blanc) can be used in a pinch, though the flavor profile will differ slightly. You can also omit it, but you’ll lose some of the authentic depth; consider adding a splash of chicken broth to compensate for the liquid.
  • Garnish: Beyond toasted sesame seeds and thinly sliced scallions, consider a sprinkle of shichimi togarashi (Japanese seven-spice blend) for a delightful kick, or finely shredded nori (seaweed) for an umami boost.
  • Add Vegetables: For a complete meal in one pan, stir-fry quick-cooking vegetables like broccoli florets, snap peas, bell peppers, or sliced mushrooms in the same pan after cooking the chicken, then toss them with the finished teriyaki sauce.

What to Serve With It

A well-balanced Japanese meal complements the rich, savory-sweetness of Teriyaki Chicken with contrasting textures and flavors. Think about refreshing, palate-cleansing sides that cut through the richness and add a sense of tradition to your plate.

  • Steamed Short-Grain Rice: The quintessential pairing. Its neutral flavor and sticky texture perfectly absorb the delicious teriyaki sauce.
  • Miso Soup: A light, savory broth with tofu and seaweed provides a comforting and authentic start or accompaniment.
  • Pickled Ginger (Gari): The sharp, sweet, and spicy notes of pickled ginger are excellent for cleansing the palate between bites of rich chicken.
  • Blanched Greens with Sesame Dressing (Gomae): Spinach or green beans lightly blanched and tossed with a simple sesame dressing (toasted sesame seeds, soy sauce, a touch of sugar) offer a refreshing counterpoint.
  • Sunomono (Cucumber Salad): Thinly sliced cucumbers marinated in a sweet and tangy vinegar dressing provide a crisp, cooling, and acidic contrast.
  • Simple Green Salad: A mix of crisp lettuce with a light, Japanese-style dressing (like a ginger-sesame vinaigrette) adds freshness without overwhelming the main dish.

Make Ahead, Storage & Reheating

Japanese Chicken Teriyaki is a fantastic dish for meal prep, as both the chicken and the sauce hold up beautifully. Here’s how to manage it expertly:

  • Make Ahead:
    • Teriyaki Sauce: The sauce can be made up to 5 days in advance and stored in an airtight container in the refrigerator. It may thicken slightly; gently warm it on the stovetop over low heat, adding a teaspoon of water or sake if needed, before serving.
    • Marinated Chicken: You can marinate the chicken for up to 24 hours in the refrigerator. Ensure it’s in a non-reactive container or a sealed bag.
  • Storage:
    • Refrigeration: Once cooked, store leftover chicken teriyaki and any remaining sauce in separate airtight containers in the refrigerator for up to 3-4 days.
    • Freezing: For longer storage, cooked chicken teriyaki can be frozen for up to 2-3 months. Allow the chicken to cool completely, then transfer it to freezer-safe bags or containers with a little extra sauce to prevent drying. Thaw overnight in the refrigerator before reheating.
  • Reheating:
    • Microwave: For individual portions, place chicken and sauce in a microwave-safe dish, cover loosely, and heat on medium power for 1-2 minutes, stirring halfway, until heated through. Be careful not to overheat, which can dry out the chicken.
    • Stovetop: For larger portions or to retain crispy skin, place the chicken and sauce in a skillet over medium-low heat. Add a tablespoon of water or sake to help rehydrate and prevent sticking. Cover and gently warm for 5-7 minutes, flipping the chicken once, until heated through.
    • Oven: For the best results, especially if you want to revive crispy skin, preheat your oven to 300°F (150°C). Place chicken on a baking sheet, add a splash of water or broth to the bottom of the pan, cover loosely with foil, and heat for 10-15 minutes. For a crisper finish, remove the foil for the last 5 minutes.

Common Mistakes to Avoid

Even a seemingly simple dish like Chicken Teriyaki has pitfalls. Sidestep these common errors for consistently perfect results:

  • Overcooking the Chicken: Teriyaki chicken should be juicy and tender, not dry and tough. Use a meat thermometer to ensure chicken thighs reach 175°F (80°C) for optimal tenderness (chicken breast to 165°F/74°C). Pull it off the heat just as it hits this mark, as it will continue to cook slightly while resting.
  • Burning the Sauce: The high sugar content in teriyaki sauce makes it prone to burning if the heat is too high or if it’s left unattended. Always simmer the sauce over medium-low to medium heat, stirring frequently, especially as it thickens. If it starts to brown too quickly, reduce the heat immediately.
  • Not Reducing the Sauce Enough: A thin, watery sauce won’t coat the chicken properly and lacks the desired depth of flavor. Be patient and allow the sauce to simmer until it visibly thickens to a syrupy consistency that clings to the back of a spoon. This typically takes 8-12 minutes for a standard batch.
  • Crowding the Pan: When searing the chicken, resist the urge to cram too many pieces into the pan. Crowding lowers the pan’s temperature, causing the chicken to steam rather than sear, resulting in less browning and less flavor. Cook in batches if necessary, ensuring each piece has enough space.
  • Skipping the Rest: After cooking, let the chicken rest for 5-10 minutes before slicing. This allows the juices to redistribute throughout the meat, ensuring every bite is succulent and flavorful.

More Questions

Can I use chicken breast instead of thighs for this recipe?

Yes, you can! However, chicken breast is leaner and tends to dry out more easily. To get the best results, we recommend brining the chicken breast for 30 minutes in a 1.5% salt solution before marinating. Cook it to an internal temperature of 165°F (74°C), which is lower than thighs, and be mindful not to overcook. You may also want to slice the breast into thinner cutlets or pieces to ensure even cooking and better sauce penetration.

Why is my teriyaki sauce too thin and not coating the chicken?

The most common reason for a thin teriyaki sauce is insufficient reduction. The sauce needs to simmer over medium-low heat for a good 8-12 minutes, uncovered, until the sugar caramelizes slightly and the liquid evaporates, allowing it to thicken into a glossy, syrupy consistency. If it’s still too thin after this time, you can whisk in a cornstarch slurry (1 tsp cornstarch mixed with 1 tbsp cold water) and simmer for another minute until it reaches your desired thickness.

What’s the secret to getting crispy skin on my teriyaki chicken?

The key to truly crispy skin lies in a few crucial steps. First, ensure your chicken skin is thoroughly patted dry with paper towels before cooking. Second, place the chicken skin-side down in a cold, non-stick or well-seasoned cast-iron pan. Turn the heat to medium-low and allow the fat to render slowly for about 8-10 minutes, pressing down occasionally with a spatula. This slow rendering process crisps the skin beautifully without burning. Once golden and crisp, increase the heat to medium-high to finish cooking the other side and glaze with the sauce.

May 24, 2026 0 comments
1 FacebookTwitterPinterestEmail

Recent Posts

  • Vietnamese Fresh Spring Rolls (Goi Cuon)
  • Chinese Beef and Broccoli
  • Japanese Chicken Katsu
  • Korean Fried Chicken (Dakgangjeong)
  • Thai Basil Chicken (Pad Krapow Gai)

Categories

  • Chinese
  • Guides
  • Japanese
  • Korean
  • Recipes
  • Reviews
  • Thai
  • Vietnamese
  • English
    • Français(French)
    • Deutsch(German)
    • 日本語(Japanese)
    • 한국어(Korean)
    • Español(Spanish)
    • Tiếng Việt(Vietnamese)

Get tested recipes in your inbox

Join AIO Kitchen — weekly tested recipes, smart guides & honest reviews. No spam.

Check your inbox to confirm your subscription. Thank you!

  • Facebook
  • Instagram
  • Pinterest
  • About AIO Kitchen
  • Affiliate Disclosure
  • Chinese Recipes — The Complete Guide
  • Contact
  • Disclaimer
  • Japanese Recipes — The Complete Guide
  • Korean Recipes — The Complete Guide
  • Privacy Policy
  • Terms of Use
  • Thai Recipes — The Complete Guide
  • Vietnamese Recipes — The Complete Guide

© 2026 AIO Kitchen. All Rights Reserved.


Back To Top
AIO Kitchen
  • Home
  • Recipes
  • Guides
  • Reviews
  • About AIO Kitchen
  • Contact
  • Cuisines
    • Vietnamese
    • Thai
    • Korean
    • Japanese
    • Chinese
  • English
    • Français
    • Deutsch
    • 日本語
    • 한국어
    • Español
    • Tiếng Việt