AIO Kitchen
  • Home
  • Recipes
  • Guides
  • Reviews
  • About AIO Kitchen
  • Contact
  • Cuisines
    • Vietnamese
    • Thai
    • Korean
    • Japanese
    • Chinese
  • English
    • Français
    • Deutsch
    • 日本語
    • 한국어
    • Español
    • Tiếng Việt
AIO Kitchen
Tested recipes · smart guides · honest reviews
Home - Korean
Category:

Korean

Authentic Korean recipes — bibimbap, bulgogi, Korean fried chicken and more, with tested steps and the essential ingredients explained.

Watch: Korean Recipe Videos

Korean Fried Chicken (Dakgangjeong)
KoreanRecipes

Korean Fried Chicken (Dakgangjeong)

by D L May 25, 2026
written by D L

Watch how to make it

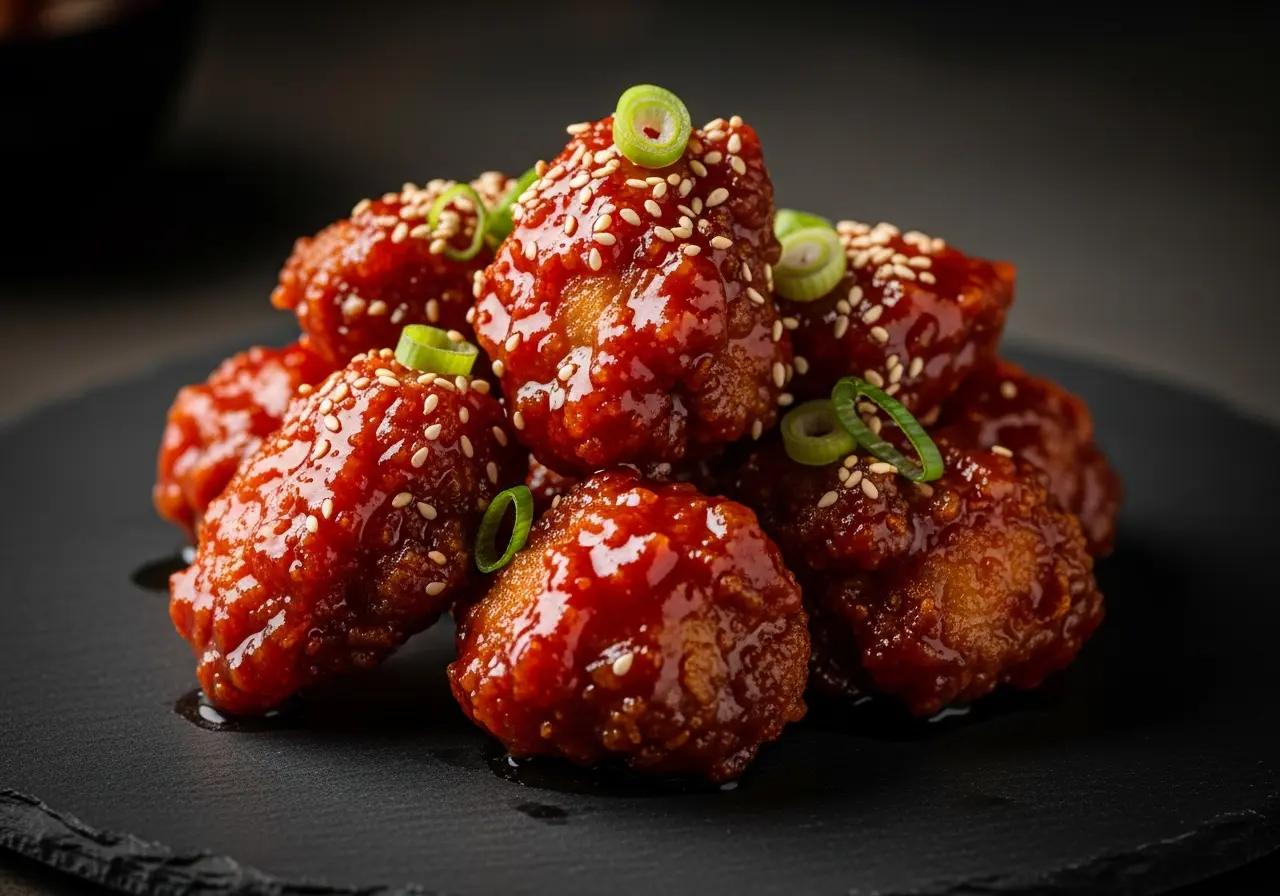
Korean fried chicken is famous for one thing: a crust that stays crackly even under a wet, sticky glaze. The secret is double-frying — once to cook, once to crisp — and a thin starch coating instead of heavy batter. Tossed in a gochujang-honey-garlic sauce, it’s the kind of chicken people fight over.

Why this recipe works

  • Double-fry — the first fry cooks the chicken, the second (hotter) fry drives off moisture for a glassy crunch.
  • Potato or corn starch, not flour — starch fries lighter and crisper and resists going soggy.
  • Glaze off the heat — toss the chicken in warm (not boiling) sauce so the crust survives.

Key ingredients

Chicken wings or boneless thigh, potato starch, and a glaze built on gochujang, honey, soy sauce, garlic and rice vinegar. Full amounts in the recipe card below.

Tips from our kitchen

  • Dry the chicken thoroughly before coating — surface moisture is the enemy of crunch.
  • Keep the oil at 160°C for the first fry, then 190°C for the second.
  • Make the sauce while the chicken rests between fries so everything comes together hot.

Frequently asked questions

Why double-fry?

The first fry at a lower temperature cooks the meat through; the second at a higher temperature blisters and dehydrates the crust so it stays crunchy under the glaze.

Can I bake or air-fry instead?

You can air-fry for a lighter version, but you won’t get the same glassy crust. Toss air-fried pieces in the glaze just before serving.

How do I keep it crispy?

Glaze only what you’ll eat immediately, and toss in warm rather than simmering sauce.

Korean Fried Chicken (Dakgangjeong)

Korean Fried Chicken (Dakgangjeong)

Print Recipe Pin Recipe
Prep Time 20 minutes mins
Cook Time 20 minutes mins
Total Time 40 minutes mins
Servings: 4 servings
Course: Main Course
Cuisine: Korean
Ingredients Method Notes

Ingredients
  

  • 700 g chicken wings or boneless thigh
  • 1/2 cup potato starch
  • 1 tsp salt
  • 1/2 tsp black pepper
  • neutral oil for frying
  • 3 tbsp gochujang
  • 3 tbsp honey
  • 2 tbsp soy sauce
  • 2 tbsp rice vinegar
  • 4 cloves garlic minced
  • 1 tbsp sesame seeds
  • 2 scallions sliced

Method
 

  1. Pat the chicken very dry, season with salt and pepper, then toss in potato starch to coat.
  2. Heat oil to 160°C and fry the chicken in batches for 7–8 minutes; remove and rest 5 minutes.
  3. Meanwhile, simmer the gochujang, honey, soy sauce, vinegar and garlic until glossy; keep warm.
  4. Raise the oil to 190°C and fry the chicken a second time for 3–4 minutes until deep golden and crisp.
  5. Toss the hot chicken in the warm glaze, then finish with sesame seeds and scallions.

Notes

For extra crunch, let the starch-coated chicken sit 10 minutes before the first fry.

Variations & substitutions

  • Chicken Cut: While boneless, skinless thighs are our top recommendation for their tenderness and moisture, you can certainly use boneless breast for a leaner option. Just be mindful to reduce frying time slightly to prevent drying out. Chicken wings (drumettes and flats) also work beautifully, offering a more traditional fried chicken experience, though they require a bit more sauce per piece due to bone-in structure.
  • Spice Level: Adjust the amount of gochugaru (Korean chili flakes) to your preference. For a milder version, reduce it by half. For a fiery kick, add an extra teaspoon or two. You can also incorporate a small amount (1/2 teaspoon) of gochujang (Korean chili paste) into the sauce for a deeper, fermented chili flavor, but be aware it will thicken the sauce slightly.
  • Sweetness: Our recipe balances sweetness perfectly, but if you prefer it less sweet, reduce the corn syrup or sugar by 1-2 tablespoons. Conversely, for a sweeter glaze, add another tablespoon of corn syrup. Honey can be a substitute for corn syrup, but it will yield a slightly different flavor profile.
  • Gluten-Free: To make this recipe gluten-free, substitute the all-purpose flour in the coating with an equal amount of rice flour or a gluten-free all-purpose blend. Ensure your soy sauce is replaced with tamari or a certified gluten-free soy sauce.
  • Vegetarian/Vegan: This technique works wonderfully with firm tofu or king oyster mushrooms. For tofu, press it thoroughly to remove excess water, then cut into bite-sized pieces and proceed with the dredging and frying steps. For king oyster mushrooms, slice them into rounds or planks. Adjust frying times accordingly until golden and crisp.

What to serve with it

Dakgangjeong is a star dish, but in Korean cuisine, balance is key. It’s often enjoyed as part of a larger meal, alongside various banchan (side dishes) that offer contrasting textures and flavors, cutting through the richness of the fried chicken. A simple bowl of steamed rice is almost always present to soak up any extra sauce and provide a neutral base. For a truly authentic experience, pair it with these traditional accompaniments:
  • Steamed White Rice: An absolute essential. Its mild flavor and soft texture perfectly complement the crispy, saucy chicken.
  • Kimchi: Whether it’s classic napa cabbage kimchi or kkakdugi (diced radish kimchi), its spicy, sour, and fermented notes are a fantastic counterpoint to the sweet and savory chicken.
  • Pickled Radish (Danmuji): The bright yellow, thinly sliced pickled daikon radish offers a refreshing crunch and tangy sweetness that cleanses the palate.
  • Simple Green Salad: A light, fresh salad with a clear, tangy dressing (like a soy-ginger vinaigrette) provides a welcome textural and flavor contrast.
  • Korean Beer (Maekju) or Soju: For adults, a cold bottle of Hite or Cass beer, or a shot of chilled soju, is the classic beverage pairing with Korean fried chicken.

Make ahead, storage & reheating

Dakgangjeong is undeniably best enjoyed fresh, straight from the wok, when the chicken is at its crispiest and the sauce is perfectly glazed. However, some components can be prepared in advance, and leftovers can be stored and reheated with specific methods to minimize texture loss.
  • Make Ahead: The sauce can be made up to 3 days in advance and stored in an airtight container in the refrigerator. Gently reheat it over low heat, stirring frequently, before tossing with freshly fried chicken. The chicken itself should ideally be fried just before serving for optimal crispness.
  • Storage (Cooked Chicken): Store any leftover Dakgangjeong in an airtight container in the refrigerator for up to 2-3 days. While the chicken will lose some of its initial crispness, the flavor remains delicious. Freezing is generally not recommended for fried chicken as it significantly degrades the texture upon thawing and reheating.
  • Reheating: To restore as much crispness as possible, avoid the microwave. The best methods are:
    • Air Fryer: Preheat to 350°F (175°C). Arrange chicken in a single layer and air fry for 5-8 minutes, or until heated through and crisp.
    • Oven: Preheat oven to 375°F (190°C). Spread chicken on a baking sheet lined with parchment paper. Bake for 10-15 minutes, flipping halfway, until hot and somewhat crispy.

Common mistakes to avoid

  • Overcrowding the Fryer: This is a cardinal sin of frying. Adding too much chicken at once drastically drops the oil temperature, leading to greasy, soggy chicken that doesn’t crisp up properly. Fry in small batches, ensuring there’s plenty of space around each piece.
  • Skipping the Double Fry: The signature ultra-crisp texture of Dakgangjeong comes from frying the chicken twice. The first fry cooks the chicken through, and the second fry, at a higher temperature, crisps up the coating and expels any remaining moisture. Don’t skip this crucial step!
  • Not Drying the Chicken Thoroughly: Any excess moisture on the chicken before dredging will cause the coating to become gummy, prevent it from adhering properly, and can lead to dangerous oil splattering. Pat the chicken pieces bone-dry with paper towels before seasoning and dredging.
  • Using the Wrong Starch: While all-purpose flour can work, using a combination of all-purpose flour and potato starch (or cornstarch) is key for the distinctively light, airy, and incredibly crispy crust. Potato starch, in particular, contributes to that unique Korean fried chicken texture.
  • Tossing with Cold Sauce: For the best adherence and a beautiful glaze, the sauce should be warm when you toss the freshly fried chicken in it. A cold sauce will clump and won’t coat the chicken as evenly or effectively, potentially making the chicken less crispy faster.

More questions

Can I make Dakgangjeong without deep-frying?

While deep-frying yields the most authentic and superior result in terms of crispness and texture, you can achieve a respectable version using an air fryer or oven. For an air fryer, toss the dredged chicken with 1-2 tablespoons of oil, then air fry at 375°F (190°C) for 18-25 minutes, flipping halfway, until golden and cooked through. For oven baking, toss with oil and bake at 400°F (200°C) for 25-35 minutes, flipping once. In both cases, you’ll still want to do a ‘double-fry’ equivalent by increasing the temperature for the last 5-7 minutes to enhance crispness before tossing in the warm sauce.

What’s the difference between Dakgangjeong and Yangnyeom Chicken?

Both are popular Korean fried chicken dishes with a sauce coating, but they have distinct characteristics. Dakgangjeong typically features smaller, often boneless pieces of chicken with an extra-crispy, almost candy-like crust, coated in a thinner, often sweeter and tangier glaze that hardens slightly. Yangnyeom Chicken, on the other hand, usually uses larger, sometimes bone-in pieces, and is known for its thicker, richer, and often spicier sauce that’s more savory and complex, sometimes including gochujang and various aromatics, and often garnished with peanuts.

How do I get the sauce to stick perfectly to the chicken?

The key to a perfectly coated Dakgangjeong is timing and temperature. First, ensure your chicken is fried to maximum crispness and drained very well of excess oil immediately after its second fry. Second, make sure your sauce is warm when you’re ready to toss. The residual heat from the freshly fried chicken, combined with the warmth of the sauce, helps the glaze adhere beautifully and caramelize slightly, creating that irresistible sticky-crisp exterior. Toss quickly and evenly in a large bowl or wok to coat every piece.

May 25, 2026 0 comments
0 FacebookTwitterPinterestEmail
Thinly sliced, perfectly marinated Korean Beef Bulgogi, sizzling on a grill or pan.
KoreanRecipes

Korean Beef Bulgogi (Marinated BBQ Beef)

by D L May 25, 2026
written by D L

Watch how to make it

Bulgogi — “fire meat” — is Korea’s beloved marinated beef: thin slices in a sweet-savory marinade of soy, pear, garlic and sesame, seared hot and fast. It’s caramelised, juicy and endlessly versatile over rice, in lettuce wraps, or in bibimbap.

Why this recipe works

  • Grated pear in the marinade tenderises the beef and adds natural sweetness.
  • Slice the beef thin (freeze 30 min first) so it cooks in seconds and soaks up marinade.
  • Sear in batches over high heat for caramelisation, not steaming.

Key ingredients

Thin-sliced ribeye or sirloin, soy sauce, Asian pear, garlic, sesame oil, sugar, scallions and sesame seeds. Full quantities in the recipe card.

Tips from our kitchen

  • Marinate at least 30 minutes (or overnight) for deeper flavour.
  • Get the pan or grill ripping hot so the marinade caramelises rather than boils.
  • Serve with rice, ssamjang and lettuce for wraps.

Thinly sliced, perfectly marinated Korean Beef Bulgogi, sizzling on a grill or pan.

Korean Beef Bulgogi

Print Recipe Pin Recipe
Prep Time 35 minutes mins
Cook Time 10 minutes mins
Total Time 45 minutes mins
Servings: 3 servings
Course: Main Course
Cuisine: Korean
Ingredients Method Notes

Ingredients
  

  • 400 g ribeye thinly sliced
  • 4 tbsp soy sauce
  • 1/4 Asian pear grated
  • 3 cloves garlic minced
  • 1 tbsp sesame oil
  • 1 tbsp sugar
  • 2 scallions
  • 1 tsp sesame seeds

Method
 

  1. Mix soy, grated pear, garlic, sesame oil and sugar into a marinade.
  2. Marinate the sliced beef at least 30 minutes (or overnight).
  3. Sear in batches in a ripping-hot pan or grill until caramelised.
  4. Garnish with scallions and sesame seeds; serve with rice.

Notes

Freeze the beef 30 min before slicing for paper-thin pieces.

Frequently asked questions

What’s the best cut?

Well-marbled ribeye is classic and juicy; sirloin is a leaner option. Slice thinly against the grain.

No Asian pear?

Substitute a ripe regular pear or kiwi for the tenderising enzymes — don’t marinate too long with kiwi or the meat turns mushy.

Variations & substitutions

  • Meat Swaps: While thinly sliced ribeye is classic, you can achieve delicious results with other cuts. Try sirloin, flank steak (sliced thinly against the grain), or even thinly sliced pork shoulder (for a twist on Daeji Bulgogi). For poultry, use boneless, skinless chicken thighs or thinly sliced chicken breast.
  • Vegetarian/Vegan Option: Replace beef with firm or extra-firm tofu (pressed and sliced) or hearty mushrooms like king oyster or portobello. Adjust marinating time as plant-based proteins don’t require tenderizing. Ensure your soy sauce is gluten-free (tamari) if needed.
  • Sweetener Alternatives: Asian pear is traditional, but a small amount of grated apple, kiwi (use sparingly, 1/2 kiwi for 1 lb beef, marinate no longer than 30 minutes), or pineapple juice can substitute. For the sugar, brown sugar, honey, or even a touch of maple syrup can be used.
  • Spice Level: For a spicy kick, add 1-2 tablespoons of Gochujang (Korean chili paste) to the marinade. This creates a spicier, slightly richer flavor profile.
  • Added Vegetables: Feel free to incorporate thinly sliced yellow onions, carrots, bell peppers, or mushrooms (shiitake or cremini) directly into the marinade for the last 30 minutes, or stir-fry them alongside the beef, adding them a few minutes before the beef is fully cooked.

What to serve with it

Bulgogi is the centerpiece of a traditional Korean meal, designed to be enjoyed with a variety of complementary dishes that offer balance in flavor and texture. Think fresh, fermented, and comforting elements that cut through the richness of the beef and cleanse the palate. The best way to enjoy it is family-style, allowing everyone to mix and match.

  • Steamed Short-Grain White Rice: The absolute essential. Its mild flavor and sticky texture are perfect for soaking up the savory bulgogi sauce.
  • Kimchi: Fermented napa cabbage kimchi is a must-have, offering a spicy, tangy, and umami counterpoint. Radish kimchi (kkakdugi) or cucumber kimchi (oi sobagi) are also excellent.
  • Ssam (Lettuce Wraps): Fresh red leaf lettuce, perilla leaves (kkaennip), or even steamed cabbage leaves provide a refreshing wrapper. Fill with a piece of bulgogi, a dab of ssamjang (spicy dipping sauce), and a bit of rice.
  • Banchan (Side Dishes): A selection of small Korean side dishes elevates the meal. Popular choices include seasoned spinach (sigeumchi namul), bean sprout salad (kongnamul muchim), pickled radish, or spicy cucumber salad (oi muchim).
  • Pajeori (Scallion Salad): Thinly sliced scallions tossed in a light, tangy dressing of soy sauce, vinegar, and gochugaru (Korean chili flakes) offer a sharp, fresh contrast.
  • Doenjang Jjigae or Kimchi Jjigae: A warm, savory stew like fermented soybean paste stew or kimchi stew provides a comforting and deeply flavorful accompaniment, especially on cooler days.

Make ahead, storage & reheating

Bulgogi is a fantastic dish for meal prep, especially the marinating stage, which actually improves its flavor and tenderness over time. Proper storage ensures you can enjoy delicious bulgogi with minimal fuss.

  • Make Ahead (Marination): The beef can be marinated in an airtight container or a heavy-duty zip-top bag in the refrigerator for up to 2-3 days. This allows the flavors to deepen considerably. If using kiwi or pineapple as a tenderizer, limit marination to 30 minutes to prevent the meat from becoming mushy. Asian pear is gentler and allows for longer marination.
  • Storage (Raw, Marinated): Store raw, marinated beef in a sealed container in the coldest part of your refrigerator for up to 3 days.
  • Storage (Cooked): Once cooked, allow the bulgogi to cool completely before transferring it to an airtight container. It can be stored in the refrigerator for 3-4 days.
  • Freezing (Raw, Marinated): For longer storage, raw marinated bulgogi freezes beautifully. Place the marinated beef (without excess liquid) in a single layer in a freezer-safe zip-top bag, pressing out all air. Freeze flat for up to 3 months. Thaw overnight in the refrigerator before cooking.
  • Freezing (Cooked): While possible, freezing cooked bulgogi can slightly alter the texture of the beef, making it a bit tougher upon reheating. If freezing, cool completely, then store in an airtight, freezer-safe container for up to 1-2 months.
  • Reheating (Cooked): The best way to reheat cooked bulgogi is in a hot skillet over medium-high heat. Add a tiny splash of water or beef broth to prevent drying, and stir-fry quickly for 2-3 minutes until heated through. Avoid overcooking, as this will toughen the meat. If reheating from frozen, thaw in the refrigerator first, then reheat as above.

Common mistakes to avoid

  • Not Slicing the Beef Thinly Enough: Bulgogi relies on very thin slices (about 1/8 to 1/4 inch thick) to ensure quick cooking and maximum tenderness. Thicker slices will cook unevenly and can become tough. Partially freezing the beef for 30-45 minutes makes it much easier to slice thinly.
  • Over-Marinating with Strong Tenderizers: If your marinade includes kiwi, pineapple, or other strong enzymatic tenderizers, do NOT marinate for more than 30 minutes. These enzymes will break down the meat fibers too aggressively, resulting in a mushy, undesirable texture. Asian pear is a milder tenderizer and allows for longer marination.
  • Overcrowding the Pan: This is a cardinal sin for bulgogi! When you add too much meat to the pan at once, it drastically lowers the pan’s temperature. Instead of searing and caramelizing, the beef will steam in its own juices, resulting in grey, watery, and tough meat. Cook in small batches, ensuring there’s plenty of space between pieces.
  • Cooking on Too Low Heat: Bulgogi needs high heat to achieve that beautiful caramelization and slight char. A lukewarm pan will steam the meat, preventing the Maillard reaction and leaving you with less flavorful, tougher beef. Always preheat your pan or grill to medium-high or high heat.
  • Adding Too Many Vegetables Too Early: While vegetables are a great addition, adding them all at the beginning will release too much moisture, again dropping the pan temperature and steaming the beef. If incorporating vegetables like onions or bell peppers, add them towards the end of the cooking process (the last 2-3 minutes) so they retain some crispness and don’t water down the dish.

More questions

Can I make this bulgogi spicy?

Absolutely! To add a delightful kick, simply incorporate 1 to 2 tablespoons of Gochujang (Korean chili paste) into your marinade. Start with 1 tablespoon and add more if you prefer a higher level of heat. The gochujang will also add a subtle depth and richness to the sauce, giving it a slightly different, but equally delicious, character. You can also serve gochujang on the side for individual customization.

What’s the secret to getting a good sear and caramelization on the beef without overcooking it?

The key lies in high heat and not overcrowding your cooking surface. First, ensure your skillet (cast iron works wonderfully) or grill is screaming hot over medium-high to high heat before adding any beef. Second, cook the bulgogi in small batches. This allows the pan temperature to remain high, ensuring the meat sears quickly and develops a beautiful caramelized crust rather than steaming. Resist the urge to constantly stir; let the beef sit for 30-60 seconds on one side to achieve that desirable char before flipping and stir-frying for just 2-4 minutes total.

My bulgogi turned out tough. What went wrong?

There are a few common culprits for tough bulgogi. The most frequent issues are: 1) The beef wasn’t sliced thinly enough or wasn’t sliced against the grain. Thin, cross-grain slices are crucial for tenderness. 2) The pan wasn’t hot enough, or you overcrowded it. This causes the meat to steam rather than sear, resulting in a rubbery texture. Always cook in small batches on high heat. 3) Overcooking. Bulgogi cooks very quickly due to its thinness; even an extra minute or two can turn tender beef tough. Cook just until the edges are caramelized and the meat is no longer pink. 4) If you used a strong tenderizer like kiwi, you might have over-marinated, breaking down the meat too much.

May 25, 2026 0 comments
1 FacebookTwitterPinterestEmail
A colorful Korean Bibimbap bowl, featuring rice, assorted vegetables, meat, and a fried egg.
KoreanRecipes

Korean Bibimbap (Mixed Rice Bowl)

by D L May 24, 2026
written by D L

Watch how to make it

Bibimbap — literally “mixed rice” — is Korea’s perfect bowl: warm rice topped with seasoned vegetables (namul), a protein, a fried egg, and a generous spoon of gochujang sauce, all stirred together at the table. It’s endlessly flexible, meal-prep friendly, and a brilliant way to use up vegetables.

We make this most weeks — the components keep for days, so a bowl comes together in minutes.

Why this recipe works

  • Each vegetable is seasoned separately (namul) so every bite has its own character.
  • A crispy rice bottom — if you use a hot stone or cast-iron bowl (dolsot) — adds texture.
  • The gochujang sauce ties everything together with sweet heat.

Key ingredients

Short-grain rice, spinach, carrots, bean sprouts, shiitake mushrooms, beef bulgogi (optional), eggs, and gochujang for the sauce. Sesame oil and toasted sesame seeds season the namul.

Tips from our kitchen

  • Blanch and season vegetables ahead; store separately and assemble to order.
  • For dolsot-style crispy rice, press rice into a hot oiled cast-iron bowl for 2-3 minutes.
  • Don’t skip the runny-yolk egg — it enriches the whole bowl when mixed in.

A colorful Korean Bibimbap bowl, featuring rice, assorted vegetables, meat, and a fried egg.

Korean Bibimbap

Print Recipe Pin Recipe
Prep Time 25 minutes mins
Cook Time 15 minutes mins
Total Time 40 minutes mins
Servings: 2 bowls
Course: Main Course
Cuisine: Korean
Ingredients Method Notes

Ingredients
  

  • 2 cups cooked short-grain rice
  • 100 g spinach
  • 1 carrot julienned
  • 100 g bean sprouts
  • 4 shiitake mushrooms sliced
  • 150 g beef thinly sliced
  • 2 eggs
  • 2 tbsp gochujang
  • 1 tbsp sesame oil
  • 1 tsp sesame seeds

Method
 

  1. Blanch and season spinach, bean sprouts and carrot separately with sesame oil and salt (namul).
  2. Saute mushrooms and beef until cooked.
  3. Mix gochujang with a little sesame oil and water for the sauce.
  4. Divide rice into bowls; arrange vegetables, beef and namul on top.
  5. Fry the eggs sunny-side up and place on each bowl.
  6. Add gochujang sauce and sesame seeds; mix well before eating.

Notes

For crispy rice, press into a hot oiled cast-iron bowl for 2-3 minutes.

Frequently asked questions

Is bibimbap healthy?

Yes — it’s largely vegetables and rice with a modest amount of protein. Control the gochujang sauce and oil to manage calories.

Can I make it vegetarian?

Absolutely. Skip the beef and add extra mushrooms or seasoned tofu. Check that your gochujang has no fish-derived ingredients if you’re strict.

What rice is best?

Short-grain (sushi-style) rice is traditional because its slight stickiness holds together when mixed.

Variations & substitutions

  • Protein Power-Ups: While thinly sliced beef (bulgogi-style) is classic, feel free to swap it. Try pan-fried tofu or tempeh for a vegetarian twist, sautéed shrimp for a lighter option, or even ground pork or chicken seasoned with soy sauce, garlic, and sesame oil.
  • Veggie Adventures: Don’t limit yourself to the usual suspects. Experiment with different mushrooms like shiitake or oyster, add julienned zucchini or bell peppers, or swap out spinach for blanched kale or bok choy. The key is to prepare each vegetable separately with its own subtle seasoning.
  • Grain Gains: For a nuttier flavor and added fiber, use a mix of white and brown rice, or go entirely with short-grain brown rice. Quinoa can also be a surprisingly delicious and healthy base.
  • Sauce Swaps: While gochujang is iconic, you can customize the sauce. For less heat, mix gochujang with a bit more honey or a dollop of doenjang (Korean fermented soybean paste) for a deeper, earthier flavor. A drizzle of perilla oil instead of sesame oil offers a unique, herbaceous aroma.
  • Egg-cellent Alternatives: A perfectly fried egg with a runny yolk is non-negotiable for many, but a poached egg offers a similar creamy richness without the oil. For a different texture, a simple scrambled egg or even a thin egg crepe (jidan) cut into strips can work.

What to serve with it

Bibimbap is often considered a complete meal in itself, a symphony of flavors and textures in one bowl. However, in Korean dining, a spread of banchan (small side dishes) always accompanies the main event, enhancing the experience and offering refreshing counterpoints. A simple, clear broth soup is also a common and welcome addition, especially on a cooler day, to cleanse the palate between bites.
  • Kimchi: The quintessential Korean side dish. Napa cabbage kimchi (baechu kimchi) or cubed radish kimchi (kkakdugi) provides a spicy, sour, and fermented kick that beautifully cuts through the richness of the bibimbap.
  • Miyeokguk (Seaweed Soup): A light, savory clear broth made with rehydrated seaweed, often seasoned simply with soy sauce and garlic. It’s nourishing and refreshing.
  • Oi Muchim (Spicy Cucumber Salad): Crisp cucumber slices tossed in a gochugaru (Korean chili powder) dressing with garlic, vinegar, and sesame oil. Adds a fresh, tangy crunch.
  • Gyeran Jjim (Steamed Egg Custard): A fluffy, savory steamed egg dish, often served in a hot stone bowl. It’s comforting and mild, offering a lovely contrast to the bibimbap’s bold flavors.
  • Danmuji (Pickled Yellow Radish): Thinly sliced, bright yellow pickled radish offers a sweet, tangy, and crunchy bite that’s incredibly refreshing.

Make ahead, storage & reheating

Bibimbap is best enjoyed freshly assembled, but many of its components can be prepared in advance to streamline meal prep. This makes it a fantastic option for busy weeknights.
  • Individual Components (Make Ahead):
    • Cooked Rice: Store cooled, cooked short-grain rice in an airtight container in the refrigerator for up to 3-4 days.
    • Sautéed Vegetables: Each seasoned vegetable (spinach, carrots, mushrooms, etc.) can be stored separately in airtight containers in the fridge for up to 3-4 days. This prevents flavors from melding prematurely and maintains individual textures.
    • Cooked Meat: Marinated and cooked beef or other proteins can be refrigerated in an airtight container for 3-4 days.
    • Gochujang Sauce: The mixed gochujang sauce can be made well in advance and stored in a sealed jar in the refrigerator for several weeks.
  • Assembled Bibimbap (Storage): While not ideal due to potential sogginess of some ingredients and texture changes in the egg, a fully assembled bowl of bibimbap can be stored in an airtight container in the refrigerator for up to 1-2 days.
  • Freezing: Freezing assembled bibimbap is generally not recommended as the vegetables can become mushy and the egg texture degrades significantly upon thawing. Cooked white rice can be frozen for up to 1 month, and cooked beef can be frozen for 2-3 months, but always freeze them separately.
  • Reheating:
    • Individual Components: Reheat vegetables and meat gently in a non-stick pan over medium heat until warmed through, or microwave in short 30-second bursts. Reheat rice in the microwave with a splash of water, covered, or in a steamer.
    • Assembled Bowl: For a pre-assembled bowl, microwave on medium power for 1-2 minutes, stirring halfway through, until heated through. If you desire a crispy rice bottom (dolsot-style), transfer the cold bibimbap to a hot, lightly oiled cast iron skillet or dolsot, press down firmly, and cook over medium-high heat for 5-10 minutes until a crust forms on the bottom. Add a freshly fried egg for best results.

Common mistakes to avoid

  • Overcooking the Vegetables: Each vegetable should be tender-crisp, retaining its vibrant color and a slight bite. Wilting them into a mushy mess diminishes their individual texture and flavor contribution. Sauté quickly over high heat or blanch briefly.
  • Not Seasoning Each Component Individually: This is crucial! Bibimbap isn’t just a mix of unseasoned ingredients. Each vegetable, the meat, and even the rice should be seasoned lightly on its own (typically with soy sauce, garlic, sesame oil, and salt) before assembly. This builds layers of flavor that make the final mixed bowl truly dynamic.
  • Using Cold Rice: Warm, freshly cooked (or properly reheated) rice is essential. Cold rice will result in a clumpy, stiff bibimbap that doesn’t absorb the sauce and egg yolk as effectively, leading to a less cohesive and enjoyable texture.
  • Too Much Gochujang Sauce from the Start: Gochujang can be quite potent. While delicious, adding too much initially can overpower the delicate flavors of the other ingredients. Start with a conservative amount (1-2 tablespoons per serving) and add more to taste after mixing.
  • Skipping the Fried Egg (or cooking it fully): The runny yolk of a perfectly fried egg (sunny-side up) is a binding agent and a rich, creamy sauce in itself. It emulsifies with the gochujang and other ingredients, creating that signature luscious texture. A fully cooked, firm yolk won’t provide the same magic.

More questions

Can I make bibimbap vegetarian or vegan?

A: Absolutely! Bibimbap is incredibly versatile. For a vegetarian version, simply omit the beef and replace it with pan-fried firm tofu or tempeh, seasoned similarly with soy sauce, garlic, and sesame oil. For a vegan bibimbap, in addition to the tofu/tempeh, ensure your gochujang is vegan (most are, but check for fish/shellfish ingredients), use a plant-based oil for frying, and omit the fried egg. You can also find vegan egg substitutes if you want to mimic the texture. The egg’s texture. Embrace a wider variety of vegetables like mushrooms, zucchini, or bell peppers to add more substance.

What’s the best way to get crispy rice at the bottom like in dolsot bibimbap?

A: Achieving that coveted crispy rice (nurungji) is a highlight of dolsot bibimbap! If you have a traditional Korean stone pot (dolsot), preheat it thoroughly on the stovetop over medium heat for about 5 minutes. Drizzle a tablespoon of sesame oil around the bottom and sides, then firmly press a layer of warm rice onto the bottom. Arrange your prepared ingredients on top, then cook over medium-high heat for another 5-10 minutes without stirring. You’ll hear the rice crackling as it crisps. If you don’t have a dolsot, a heavy-bottomed cast iron skillet works wonderfully. Follow the same steps, pressing the rice firmly to ensure maximum contact with the hot, oiled surface.

How spicy is gochujang, and can I adjust it?

A: Gochujang (Korean chili paste) offers a unique balance of savory, sweet, and moderately spicy flavors. Its heat level can vary by brand, but it’s generally a pleasant warmth rather than an aggressive burn. You can absolutely adjust the spiciness! For less heat, reduce the amount of gochujang in your sauce, or mix it with a bit more honey or sugar to balance the spice. Adding more sesame oil or a splash of water can also dilute its intensity. If you crave more heat, feel free to add a pinch of gochugaru (Korean chili flakes) or a few slices of fresh green chili to your bowl before mixing.
May 24, 2026 0 comments
1 FacebookTwitterPinterestEmail

Recent Posts

  • Vietnamese Fresh Spring Rolls (Goi Cuon)
  • Chinese Beef and Broccoli
  • Japanese Chicken Katsu
  • Korean Fried Chicken (Dakgangjeong)
  • Thai Basil Chicken (Pad Krapow Gai)

Categories

  • Chinese
  • Guides
  • Japanese
  • Korean
  • Recipes
  • Reviews
  • Thai
  • Vietnamese
  • English
    • Français(French)
    • Deutsch(German)
    • 日本語(Japanese)
    • 한국어(Korean)
    • Español(Spanish)
    • Tiếng Việt(Vietnamese)

Get tested recipes in your inbox

Join AIO Kitchen — weekly tested recipes, smart guides & honest reviews. No spam.

Check your inbox to confirm your subscription. Thank you!

  • Facebook
  • Instagram
  • Pinterest
  • About AIO Kitchen
  • Affiliate Disclosure
  • Chinese Recipes — The Complete Guide
  • Contact
  • Disclaimer
  • Japanese Recipes — The Complete Guide
  • Korean Recipes — The Complete Guide
  • Privacy Policy
  • Terms of Use
  • Thai Recipes — The Complete Guide
  • Vietnamese Recipes — The Complete Guide

© 2026 AIO Kitchen. All Rights Reserved.


Back To Top
AIO Kitchen
  • Home
  • Recipes
  • Guides
  • Reviews
  • About AIO Kitchen
  • Contact
  • Cuisines
    • Vietnamese
    • Thai
    • Korean
    • Japanese
    • Chinese
  • English
    • Français
    • Deutsch
    • 日本語
    • 한국어
    • Español
    • Tiếng Việt